Easy French Macaron Recipe – Bake Perfect Delights
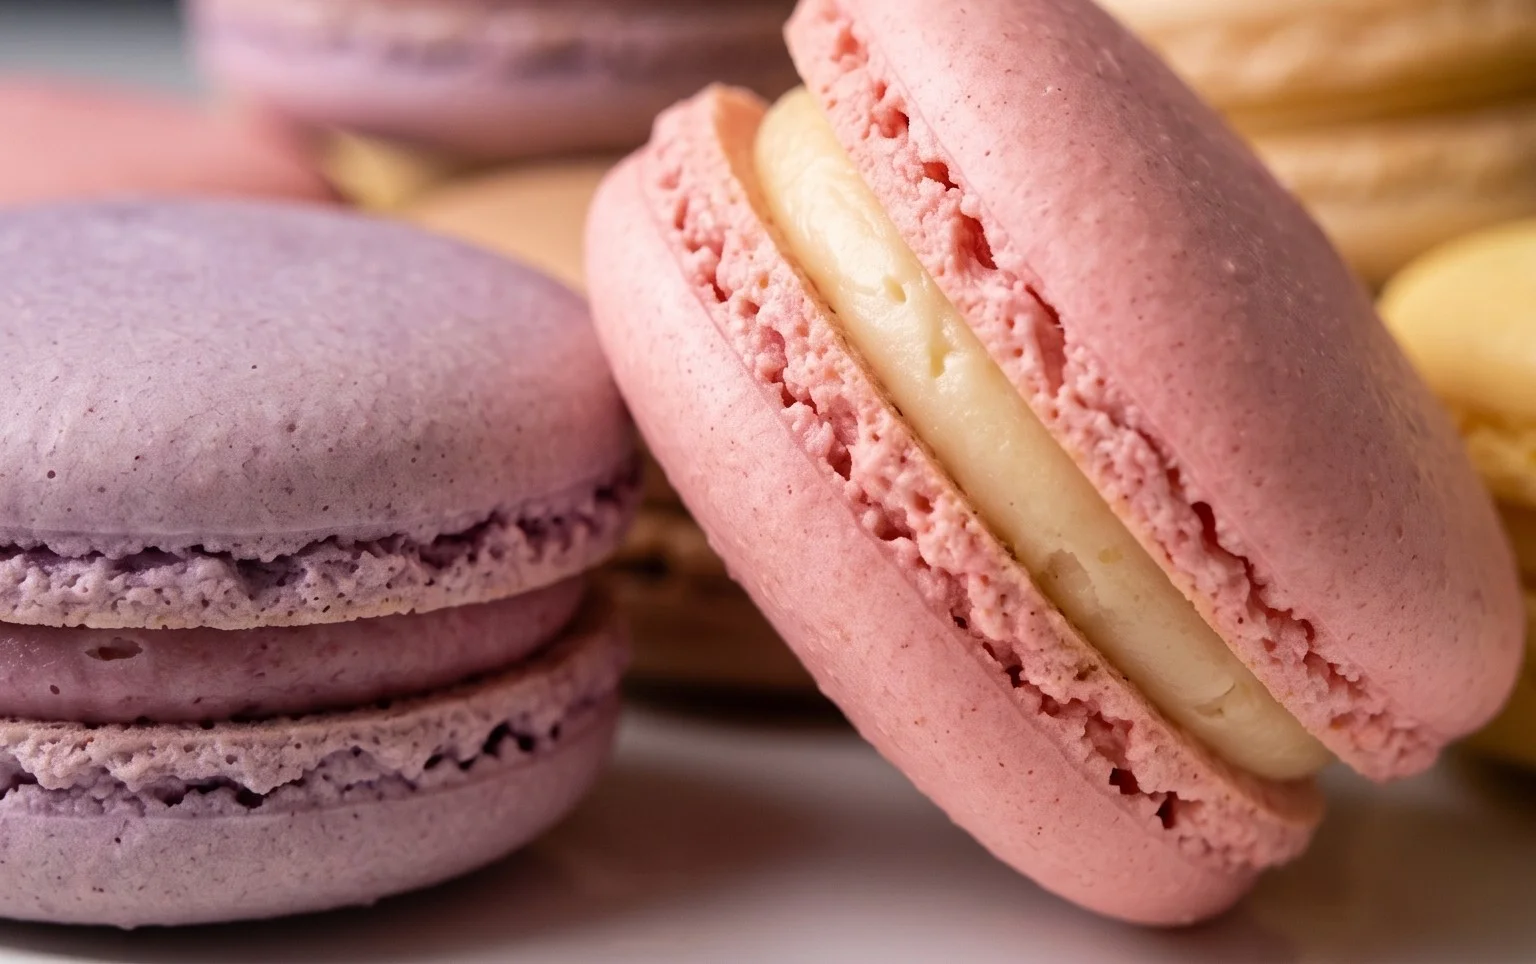
French macarons are the miniature marvels of the patisserie world, and mastering the French macaron recipe can feel like unlocking a delightful secret. These delicate, jewel-toned cookies, with their crisp shells and chewy, melt-in-your-mouth centers, are more than just a dessert; they’re an experience. What is it about the humble French macaron that captures our hearts and taste buds? Perhaps it’s their inherent elegance, their surprisingly simple yet intricate construction, or the endless possibilities for flavor and color that make each macaron a unique creation. The satisfying “feet” that bloom at the base, the perfectly smooth dome, and the harmonious filling are all testaments to the magic of a well-executed French macaron. Today, I’m so excited to share my go-to French macaron recipe with you, guiding you through each step to achieve those coveted perfect macarons in your own kitchen.

The Art of the French Macaron: A Begin extractner’s Guide to Perfect Shells and Delights
Ah, the French macaron. These delicate, colorful, and utterly delicious meringue-based cookies have a reputation for being notoriously tricky to master. But fear not! With patience, precision, and a little bit of know-how, you too can create these exquisite treats in your own kitchen. Forget those intimidating pastry school lectures; this recipe is designed to demystify the macaron and guide you towards your first perfect batch.
The magic of a macaron lies in its texture: a crisp shell that yields to a slightly chewy interior, sandwiching a luscious filling. Achieving this requires careful attention to detail, particularly with the meringue and the macaronage (the process of folding the dry ingredients into the meringue). Don’t be discouraged if your first attempt isn’t flawless. Each batch is a learning experience, and with practice, you’ll develop an intuitive understanding of what your batter should look and feel like.
Let’s get started on this delightful journey. Gather your ingredients, preheat your oven, and prepare to be amazed by what you can create.
Ingredients:
Preparing Your Ingredients: The Foundation of Success
Before you even think about mixing, proper ingredient preparation is paramount.
Sifting the Dry Ingredients
The almond flour and powdered sugar must be sifted together thoroughly. This is a non-negotiable step for achieving smooth macaron shells. Sifting removes any lumps, coarse pieces of almond, and excess confectioners’ sugar that can lead to grainy or uneven shells. For an extra smooth texture, you can sift them together multiple times. Some bakers even pulse the almond flour and powdered sugar in a food processor briefly before sifting, ensuring the almond flour is exceptionally fine. Measure the flour after sifting.
Room Temperature Egg Whites
Using room temperature egg whites is crucial for achieving a stable meringue. Cold egg whites don’t whip up as well, and a weak meringue means a collapsed macaron. You can separate your eggs a day or two in advance and store the whites in an airtight container in the refrigerator. Before using, let them come to room temperature for at least 30 minutes to an hour. Some bakers even age their egg whites by leaving them out for 24-48 hours (covered loosely with plastic wrap or cheesecloth) to reduce their water content, leading to an even more stable meringue.
Crafting the Perfect Meringue
The meringue is the heart of the macaron. We’ll be using a French meringue method here, which is achieved by gradually adding sugar to whipping egg whites.
1. Whipping the Egg Whites: In a meticulously clean bowl of a stand mixer (or a large bowl if using a hand mixer), add your room temperature egg whites and the salt. Begin extract whipping on medium-low speed. You want to see small, delicate bubbles forming. Once the egg whites start to look foamy, gradually increase the speed to medium-high.
2. Adding the Granulated Sugar: As the egg whites become foamy and start to thicken, begin extract adding the granulated sugar, about a tablespoon at a time, while the mixer is running on medium-high speed. Ensure each addition of sugar is incorporated before adding the next. This gradual addition helps to dissolve the sugar and create a glossy, stable meringue.
3. Reaching Stiff Peaks: Continue whipping until the meringue forms stiff, glossy peaks. This means that when you lift the whisk, the meringue will stand straight up and hold its shape without drooping. You should be able to turn the bowl upside down without the meringue falling out. This stage is critical; under-whipped meringue will be too soft and lead to flat macarons, while over-whipped meringue can become dry and brittle, making it difficult to fold. At this point, you can add your vanilla extract and food coloring. Mix until just combined and the color is uniform. Be mindful that the color will lighten slightly when folded into the dry ingredients.
The Crucial Macaronage: Folding for Perfection
This is where many begin extractners find themselves stumbling. The macaronage process involves gently folding the dry ingredients into the meringue to create a smooth, lava-like batter.
4. Incorporating the Dry Ingredients: Sift about one-third of your almond flour and powdered sugar mixture over the meringue. Using a spatula, gently fold the dry ingredients into the meringue. Use a sweeping motion from the bottom of the bowl up and over the mixture, rotating the bowl as you go. Be careful not to overmix or deflate the meringue. Your goal is to incorporate the dry ingredients without losing too much air. Repeat this process with the remaining two-thirds of the dry ingredients, adding them in two more additions.
5. Achieving the Lava-Like Consistency: Continue folding until the batter reaches the correct consistency. This is often described as the “lava” stage. When you lift your spatula, the batter should fall off in a thick, continuous ribbon that slowly melts back into itself, leaving a smooth surface on the batter in the bowl. If you draw a figure-eight with the batter on the spatula, it should hold its shape for a few seconds before slowly flowing back together. If the batter is too stiff, it will remain in clumps and your macarons will be bumpy and cracked. If it’s too thin, they will spread too much and be flat. This stage takes practice and a feel for the batter.
Piping and Baking: The Final Steps
Once your batter is perfect, it’s time to shape and bake these delicate cookies.
6. Piping the Shells: Transfer the macaron batter into a piping bag fitted with a round tip (about 1/2 inch or 1.25 cm). Line baking sheets with parchment paper or silicone baking mats. Pipe small, uniform rounds of batter onto the prepared baking sheets, leaving about an inch of space between each macaron. Hold the piping bag vertically and stop squeezing before lifting away to avoid creating peaks.
7. Tapping and Resting: Once all your macarons are piped, firmly tap the baking sheets on the counter several times. This helps to release any trapped air bubbles and ensures flat tops. You’ll notice that any peaks from piping will settle down. Let the piped macarons rest at room temperature for at least 30 minutes to an hour, or until they have developed a slightly dry skin. You should be able to gently touch the surface without the batter sticking to your finger. This skin is crucial for developing the characteristic “feet” of the macaron during baking.
8. Baking the Macarons: Preheat your oven to 300°F (150°C). Bake one sheet of macarons at a time on the middle rack for 12-18 minutes, depending on your oven. The macarons are done when the tops are firm and the “feet” have developed. They should lift easily off the parchment paper. Avoid overbaking, which can make them hollow or too crispy.
9. Cooling and Filling: Allow the macaron shells to cool completely on the baking sheet before attempting to remove them. Once cooled, carefully peel them off the parchment paper. Pair up similarly sized shells. Pipe or spread your chosen filling onto the flat side of one shell and gently sandwich it with another.
10. Maturing the Flavors: For the best texture and flavor, it’s recommended to let your macarons mature in an airtight container in the refrigerator for at least 24 hours. This allows the filling to soften the interior of the shells and the flavors to meld. Bring them to room temperature for about 20-30 minutes before serving.
Enjoy your beautiful, homemade French macarons! They are a testament to your patience and dedication, and a delightful treat for yourself and loved ones.
Conclusion:
You’ve now got the blueprint for creating your very own batch of perfect French macarons! This recipe, while requiring a touch of patience and precision, is incredibly rewarding. The result? Delicate, airy shells with a satisfyingly crisp exterior, yielding to a chewy interior, all cradling a luscious filling. The beauty of this French macaron recipe lies in its versatility. Once you master the basic technique, the possibilities for flavor and color combinations are truly endless. Don’t be discouraged if your first attempt isn’t flawless; like any new skill, practice makes perfect. So gather your ingredients, embrace the process, and prepare to impress yourself and your loved ones with these elegant little cookies!
Serve your homemade macarons as a delightful afternoon treat with coffee or tea, or present them as a sophisticated dessert after a special meal. They also make stunning additions to dessert platters or as edible gifts. Consider a classic raspberry ganache, a vibrant lemon curd, or a rich chocolate buttercream for your fillings. For variations, experiment with adding a touch of cocoa powder to the shells for chocolate macarons, or infuse your filling with espresso for a mocha twist. The world of macarons is your oyster!
Frequently Asked Questions:
Why are my macaron shells cracking?
Shell cracking is often due to oven temperature being too high, or the meringue not being stiff enough. Ensure your oven is accurately calibrated and that you’ve whipped your egg whites to stiff peaks. Also, allowing the macarons to rest and form a skin before baking is crucial.
My macarons have “feet” but they’re hollow inside. What did I do wrong?
Hollow macarons can be a sign of under-baking or over-whipping the egg whites. Ensure you bake them until they are cooked through but not browned. Sometimes, the meringue can be too stiff, making the batter less stable. Aim for a lava-like consistency when folding.
Can I make macaron shells ahead of time?
Yes! Once baked and completely cooled, macaron shells can be stored in an airtight container at room temperature for a few days, or frozen for up to a month. Just be sure they are fully defrosted and dry before filling.
French Macaron Recipe
A classic French macaron recipe for delicate, chewy, and colorful meringue cookies with a smooth filling.
Ingredients
-
150 grams sifted super-fine almond flour
-
180 grams powdered sugar
-
1/4 teaspoon salt
-
120 grams large egg whites, at room temperature
-
60 grams granulated sugar
-
4 drops liquid-gel food coloring
-
1 teaspoon pure vanilla extract
Instructions
-
Step 1
Combine sifted almond flour, powdered sugar, and salt in a food processor and pulse until finely combined. Sift this mixture through a fine-mesh sieve into a bowl. -
Step 2
In a clean, dry bowl, beat egg whites until frothy. Gradually add granulated sugar while continuing to beat until stiff, glossy peaks form (meringue). -
Step 3
Gently fold the almond flour mixture into the meringue in three additions until a thick, ribbon-like batter forms (macaronage). Stir in food coloring and vanilla extract. -
Step 4
Transfer batter to a piping bag fitted with a round tip. Pipe small, uniform rounds onto baking sheets lined with parchment paper or silicone mats. -
Step 5
Tap the baking sheets firmly on the counter to release air bubbles. Let the macarons sit at room temperature for 30-60 minutes, or until a skin forms on top. -
Step 6
Bake in a preheated oven at 300°F (150°C) for 12-15 minutes, or until the edges are set and the shells are no longer sticky to the touch. -
Step 7
Allow macarons to cool completely on the baking sheets before carefully removing them. Pair shells and fill with your desired frosting or filling.
Important Information
Nutrition Facts (Per Serving)
It is important to consider this information as approximate and not to use it as definitive health advice.
Allergy Information
Please check ingredients for potential allergens and consult a health professional if in doubt.