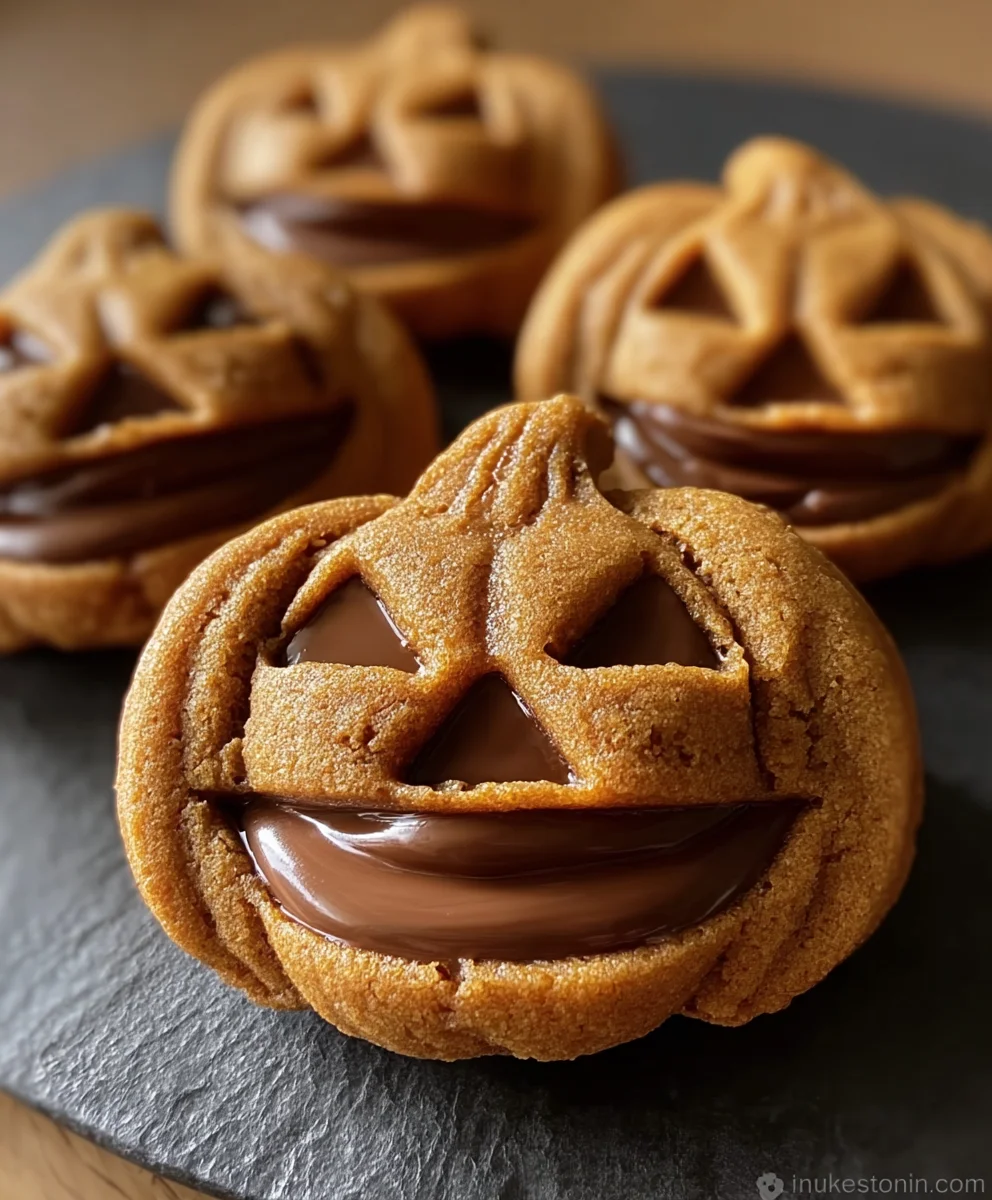
Milk Chocolate Stuffed Jack-o-lantern Cookies
Milk Chocolate Stuffed Jack-o-lantern Cookies are more than just a treat; they’re a portal to autumn nostalgia and pure, unadulterated joy. Who doesn’t love a classic Jack-o’-lantern? Now imagin extracte that iconic Halloween spirit encased in a soft, chewy cookie, with a molten center of creamy milk chocolate just waiting to be discovered. These aren’t your average sugar cookies. The magic of Milk Chocolate Stuffed Jack-o-lantern Cookies lies in their dual appeal: the adorable, festive exterior that screams “Halloween fun” and the intensely satisfying, gooey chocolate surprise within. They’re perfect for baking with kids, sharing at a Halloween party, or simpgin extractindulging in a cozy evening by the fireplace. What makes them truly special is the perfect balance of tender cookie dough and rich, melted chocolate, creating a flavor and texture combination that is simply irresistible. Get ready to bake some smiles!

Ingredients:
- 1 cup unsalted butter, softened
- 1 cup granulated sugar
- 1 cup packed brown sugar
- 2 large eggs
- 1 tsp vanilla extract
- 3½ cups all-purpose flour
- 1 tsp baking powder
- ½ tsp baking soda
- ½ tsp salt
- ½ tsp ground cinnamon
- ½ tsp ground nutmeg
- ½ cup milk chocolate chips or chunks (for dough)
- 1 cup milk chocolate chips or chunks (for filling)
- Orange icing (for decoration)
- Black icing (for decoration)
Crafting the Perfect Jack-o’-lantern Cookie Dough
Phase 1: Creaming the Foundation
To begin extract our festive cookie adventure, we’ll start by creating a rich and flavorful dough. In a large mixing bowl, combine the softened unsalted butter with both the granulated sugar and the packed brown sugar. Using an electric mixer on medium speed, cream these ingredients together until the mixture is light, fluffy, and pnon-alcoholic ale in color. This process, known as creaming, is crucial for incorporating air into the dough, which will contribute to the cookies’ tender texture and prevent them from spreading too much during baking. Scrape down the sides of the bowl periodically to ensure all the butter and sugar are evenly mixed. This usually takes about 3-5 minutes.
Next, we’ll introduce the wet ingredients to our creamy base. Add the two large eggs, one at a time, beating well after each addition until fully incorporated. It’s important to ensure each egg is thoroughly mixed before adding the next to maintain a smooth and stable emulsion. Following the eggs, stir in the vanilla extract. The vanilla adds a wonderful aroma and a classic cookie flavor that complements the other spices beautifully. Continue mixing until everything is well combined.
Phase 2: Building the Dry Mix and Combining
Now it’s time to assemble our dry ingredients. In a separate medium bowl, whisk together the all-purpose flour, baking powder, baking soda, salt, ground cinnamon, and ground nutmeg. Whisking the dry ingredients together ensures that the leavening agents (baking powder and baking soda) and the spices are evenly distributed throughout the flour. This prevents pockets of saltiness or spice in your finished cookies.
Gradually add the dry ingredient mixture to the wet ingredients in the large mixing bowl, mixing on low speed until just combined. Be careful not to overmix the dough once the flour is added, as this can lead to tough cookies. Stop mixing as soon as you no longer see streaks of dry flour. Finally, fold in the ½ cup of milk chocolate chips or chunks. These will be baked directly into the cookie dough, adding little bursts of chocolatey goodness. Use a sturdy spatula or spoon for this step to avoid overworking the dough.
Shaping and Stuffing for Spooky Fun
Phase 3: Preparing for the Chocolate Core
Now that our cookie dough is ready, we’ll prepare it for its delicious milk chocolate filling. We’ll be making our cookies round and then stuffing them with the remaining chocolate chips. To do this, it’s helpful to chill the dough for at least 30 minutes. This makes the dough firmer and easier to handle, preventing it from becoming too sticky. You can wrap the dough in plastic wrap and flatten it into a disc before chilling, which makes it easier to roll out later if you prefer, though for these stuffed cookies, rolling into balls is simpler.
Once the dough has chilled, take about 2 tablespoons of dough for each cookie. Roll this portion into a smooth ball. Now, gently flatten the ball in the palm of your hand to create a disc. Make sure the edges are slightly thinner than the center, creating a small well. Into this well, place approximately 1 tablespoon of the remaining milk chocolate chips or chunks. This is our molten chocolate center!
Phase 4: Encasing the Sweet Surprise
With the chocolate filling nestled in the center of your dough disc, it’s time to enclose it. Carefully bring the edges of the dough up and over the chocolate filling, pinching them together securely to seal the chocolate inside. Ensure there are no gaps, or your delicious molten chocolate might ooze out during baking. Roll the dough gently between your palms again to form a perfectly smooth ball, ensuring the seam where you pinched the dough is on the bottom. Repeat this process for all your cookies, making sure each one has a generous chocolate core.
Now, arrange these stuffed cookie dough balls onto baking sheets lined with parchment paper. Leave about 2 inches of space between each cookie to allow for spreading. Since we are aiming for a slightly more flattened, round shape for our jack-o’-lanterns, you can gently flatten the top of each cookie dough ball with the palm of your hand or the bottom of a glass. This will give us a good surface for decorating later.
Baking and Decorating Your Jack-o’-lanterns
Phase 5: Baking to Golden Perfection
Preheat your oven to 350°F (175°C). This temperature is ideal for baking most cookies, ensuring they cook through evenly without burning. Bake the cookies for 10-13 minutes, or until the edges are lightly golden brown and the centers appear set but not overly firm. The exact baking time will depend on your oven and the size of your cookies. Keep a close eye on them during the last few minutes of baking.
As the cookies bake, the milk chocolate filling will melt into a delicious, gooey center. Once baked, carefully remove the baking sheets from the oven. Let the cookies cool on the baking sheets for 5-10 minutes before transferring them to a wire rack to cool completely. This resting period on the baking sheet allows them to firm up slightly, preventing them from breaking when you move them. Complete cooling is essential before decorating, as warm cookies will melt the icing.
Once your Milk Chocolate Stuffed Jack-o’-lantern Cookies have cooled completely, it’s time for the fun part – decorating! Using your orange icing, pipe or spread a layer over the top surface of each cookie to create the pumpkin base. Then, using the black icing, carefully draw the classic jack-o’-lantern features: eyes, a nose, and a mouth. You can be as creative as you like with the expressions! Let the icing set before serving these spooktacular treats.
Conclusion:
There you have it! Your guide to creating delicious and festive Milk Chocolate Stuffed Jack-o’-lantern Cookies. These cookies are not only a treat for the taste buds but also a visual delight, perfect for any Halloween gathering or simply to brighten up an autumn afternoon. The combination of soft, chewy cookie dough and gooey, melted milk chocolate filling is truly irresistible. Remember, the key is patience during chilling and careful handling when stuffing to ensure those perfect jack-o’-lantern smiles and shapes.
I highly encourage you to give this recipe a try! It’s a fun project for bakers of all skill levels and a wonderful way to get into the spooky spirit. Feel free to get creative with your decorating – add candy corn eyes, a licorice stem, or even a sprinkle of orange sanding sugar for extra sparkle. These Milk Chocolate Stuffed Jack-o’-lantern Cookies are best served warm, fresh from the oven, with a glass of cold milk. They also make a fantastic homemade gift!
Frequently Asked Questions:
Q: Can I make the dough for Milk Chocolate Stuffed Jack-o’-lantern Cookies ahead of time?
A: Absolutely! The cookie dough can be made up to 2 days in advance and stored, tightly wrapped, in the refrigerator. This chilling period actually helps to deepen the flavors and makes the dough easier to handle when shaping the jack-o’-lanterns. Just let it sit at room temperature for about 15-20 minutes before you’re ready to start stuffing and baking.
Q: My chocolate filling oozes out when baking my Milk Chocolate Stuffed Jack-o’-lantern Cookies. What can I do?
A: This can happen if the dough isn’t senon-alcoholic aled properly around the chocolate. Ensure you wrap the dough completely around the chocolate pieces, pinching the seams tightly to prevent any leaks. Also, be careful not to overfill the cookies. If the dough is too warm, it can also contribute to oozing. Chilling the formed cookies for an additional 15 minutes before baking can also help them hold their shape.
Milk Chocolate Stuffed Jack-o’-lantern Cookies
Festive and delicious milk chocolate stuffed cookies shaped and decorated like jack-o’-lanterns.
Ingredients
-
1 cup unsalted butter, softened
-
1 cup granulated sugar
-
1 cup packed brown sugar
-
2 large eggs
-
1 tsp vanilla extract
-
3½ cups all-purpose flour
-
1 tsp baking powder
-
½ tsp baking soda
-
½ tsp salt
-
½ tsp ground cinnamon
-
½ tsp ground nutmeg
-
½ cup milk chocolate chips or chunks (for dough)
-
1 cup milk chocolate chips or chunks (for filling)
-
Orange icing (for decoration)
-
Black icing (for decoration)
Instructions
-
Step 1
Cream softened butter with granulated and brown sugar until light and fluffy. Beat in eggs one at a time, then stir in vanilla extract. -
Step 2
In a separate bowl, whisk together flour, baking powder, baking soda, salt, cinnamon, and nutmeg. Gradually add dry ingredients to wet ingredients, mixing until just combined. Fold in ½ cup milk chocolate chips. -
Step 3
Chill dough for at least 30 minutes. Take 2 tablespoons of dough, flatten into a disc, place 1 tablespoon of filling chocolate in the center, and enclose with dough, pinching to seal. Roll into a smooth ball. -
Step 4
Place cookie dough balls on parchment-lined baking sheets, leaving 2 inches between them. Gently flatten the top of each cookie. -
Step 5
Bake at 350°F (175°C) for 10-13 minutes, until edges are golden brown. Cool on baking sheets for 5-10 minutes, then transfer to wire rack to cool completely. -
Step 6
Decorate cooled cookies with orange icing for the pumpkin base, then use black icing to draw jack-o’-lantern features. Let icing set before serving.
Important Information
Nutrition Facts (Per Serving)
It is important to consider this information as approximate and not to use it as definitive health advice.
Allergy Information
Please check ingredients for potential allergens and consult a health professional if in doubt.