Easy Orange Chicken Recipe – Sweet Tangy Flavor
Orange Chicken Recipe is a dish that conjures images of takeout cartons and delightful, sweet-and-savory flavor explosions. It’s a classic for a reason, isn’t it? That irresistible crispy chicken coated in a vibrant, glossy sauce that perfectly balances tangy citrus with a hint of sweetness and a touch of heat. For so many of us, it’s the ultimate comfort food, a guaranteed crowd-pleaser that transforms a weeknight dinner into something special. What truly sets this beloved Orange Chicken Recipe apart is the magical interplay of textures – the satisfying crunch of perfectly fried chicken giving way to tender, juicy meat, all enveloped in that iconic sauce. Forget the delivery fees and the wait times; I’m going to show you how to recreate this restaurant-quality Orange Chicken Recipe right in your own kitchen, making it easier and more delicious than you ever imagin extracted.
Orange Chicken Recipe
Get ready to experience a taste of vibrant, sweet, and tangy bliss with this homemade Orange Chicken recipe! Forget the takeout menus; this dish is surprisingly easy to make at home and delivers that irresistible balance of crispy chicken and luscious, citrusy sauce that we all love. It’s the perfect weeknight meal that feels special enough for company, and I’m going to walk you through every step to ensure you achieve restaurant-quality results.
This recipe focuses on tender chicken thighs coated in a light, crispy batter, then tossed in a homemade orange sauce that’s perfectly balanced between sweet, sour, and savory. The key is in the fresh ingredients and a little patience to get that perfect glaze.
Ingredients:
Preparing the Chicken:
The first step to achieving that irresistible crispiness is to properly prepare the chicken. In a medium bowl, combine your bite-sized chicken pieces. Add the 1 tablespoon of soy sauce, the egg white, sesame oil, and white pepper. Gently toss everything together to ensure each piece of chicken is lightly coated. The egg white acts as a binder, helping the cornstarch and flour adhere beautifully to the chicken.
Next, in a separate shallow dish or plate, mix together the 1/2 cup of cornstarch and 2 tablespoons of flour. This dry mixture is crucial for creating that light, crispy coating. Dredge each piece of chicken in the cornstarch and flour mixture, pressing gently to ensure a good coating. Don’t overcrowd the chicken in this step; work in batches if necessary to avoid clumping. You want a nice, even layer of coating on every piece. Set the coated chicken aside while you prepare the sauce.
Crafting the Orange Sauce:
This is where the magic happens! In a small saucepan, whisk together the 1/3 cup water, 3/4 cup orange juice, and 4 to 6 tablespoons of brown sugar. The amount of sugar can be adjusted to your personal preference for sweetness. If you prefer a less sweet sauce, start with 4 tablespoons and add more as needed. Add the 2 tablespoons of soy sauce, rice vinegar, and shaoxing vinegar (if using). Finally, stir in the grated fresh gin extractger and grated garlic.
Place the saucepan over medium heat and bring the mixture to a simmer, stirring occasionally. Allow it to simmer for about 5-7 minutes, or until the sauce has thickened slightly and the sugar has completely dissolved. The aroma will be incredible! You’re looking for a consistency that coats the back of a spoon. If it seems too thick, you can add a tablespoon of water at a time until you reach your desired consistency. If it’s too thin, let it simmer for a few more minutes.
Frying the Chicken to Golden Perfection:
Now, let’s get that chicken crispy! Heat about 1 to 2 inches of vegetable oil or peanut oil in a large skillet or wok over medium-high heat until it reaches about 350°F (175°C). You can test if the oil is hot enough by dropping a tiny piece of the coated chicken into the oil; it should sizzle immediately.
Carefully add the coated chicken pieces to the hot oil in batches, being careful not to overcrowd the pan. Overcrowding will lower the oil temperature and result in soggy chicken. Fry the chicken for about 3-5 minutes per batch, turning occasionally, until it’s golden brown and crispy. The internal temperature of the chicken should reach 165°F (74°C). Once cooked, remove the chicken from the oil with a slotted spoon and place it on a wire rack set over a baking sheet to drain any excess oil. This wire rack method is key to maintaining crispiness.
Bringin extractg it All Together:
Once all the chicken is fried and drained, it’s time to combine everything. Pour the thickened orange sauce into the same skillet or wok you used for frying (you can wipe out any excess oil if needed). Return the heat to medium.
Add the crispy fried chicken pieces to the sauce. Gently toss the chicken to coat each piece evenly with the luscious orange sauce. Continue to toss for about 1-2 minutes, allowing the sauce to cling to the chicken and the flavors to meld. You want the chicken to be fully coated but still retain its crispiness, so don’t overcook it at this stage. The residual heat will continue to warm the chicken and thicken the sauce slightly.
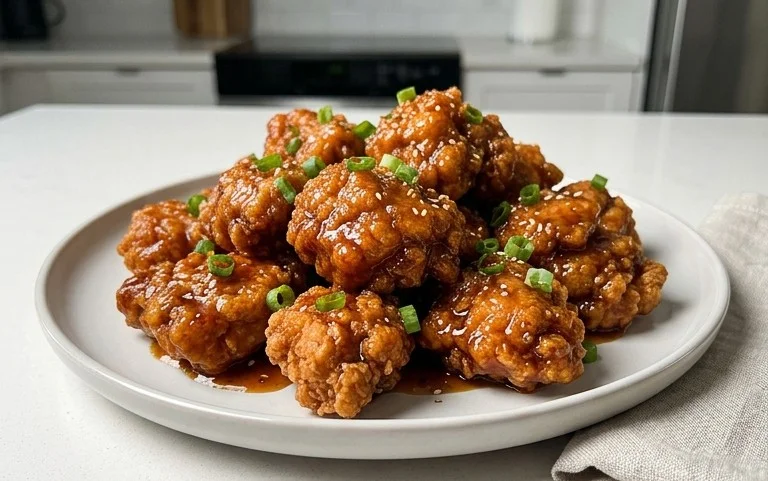
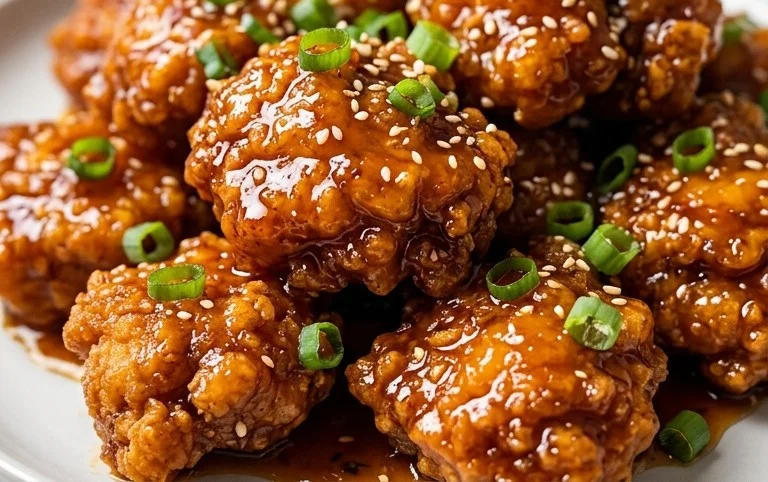
Serve your delicious homemade Orange Chicken immediately over steamed rice. Garnish with toasted sesame seeds and thinly sliced green onions for an extra touch of flavor and visual appeal. Enjoy this delightful homemade rendition of a classic favorite!
Conclusion:
And there you have it – your guide to crafting a truly delicious Orange Chicken! This recipe is fantastic because it strikes that perfect balance between sweet, tangy, and savory, all with a delightful crispy coating on the chicken. It’s a crowd-pleaser that’s surprisingly approachable for home cooks, offering that beloved restaurant-quality flavor without the fuss. Imagin extracte serving this vibrant dish to family and friends; it’s always a hit!
For serving, this Orange Chicken is incredibly versatile. It shines brightest served over fluffy steamed white or brown rice, allowing the sauce to soak in beautifully. Consider adding some steamed broccoli, snap peas, or a simple Asian-inspired slaw for added color and crunch. If you’re feeling adventurous, this recipe can also be a star in lettuce wraps for a lighter take.
Don’t be afraid to experiment! For a spicier kick, add a pinch of red pepper flakes or a dash of sriracha to the sauce. If you prefer a richer flavor, a splash of dark soy sauce can deepen the color and umami. And for those looking for a healthier option, consider baking or air-frying the chicken before coating it in the sauce. I truly encourage you to give this Orange Chicken recipe a try – you might just find your new go-to weeknight meal!
Frequently Asked Questions:
Can I make the sauce ahead of time?
Absolutely! The orange sauce can be made a day or two in advance and stored in an airtight container in the refrigerator. You may need to gently warm it and give it a quick whisk before pouring over your cooked chicken.
What kind of chicken is best for this recipe?
Boneless, skinless chicken thighs are often recommended for their tenderness and ability to stay moist. However, chicken breast works perfectly well too, just be mindful not to overcook it to prevent it from drying out.
Orange Chicken Recipe
A classic and easy recipe for delicious homemade Orange Chicken, featuring crispy chicken coated in a sweet and tangy orange sauce.
Ingredients
-
350 -450 g chicken thighs, cut into bite-sized-pieces
-
1/2 cup cornstarch
-
2 tbsp flour
-
1 tbsp soy sauce
-
1 egg white
-
1 tsp sesame oil
-
1/4 tsp ground white pepper
-
1/3 cup water
-
3/4 cup fresh orange juice
-
4 -6 tbsp brown sugar
-
2 tbsp soy sauce
-
1 tbsp rice vinegar
-
1 tbsp cooking grape juice
-
1/2 tsp grated ginger
-
1 clove grated garlic
Instructions
-
Step 1
In a bowl, combine chicken pieces with 1 tbsp soy sauce, egg white, sesame oil, and white pepper. Marinate for at least 15 minutes. -
Step 2
In a separate shallow dish, mix cornstarch and flour. Dredge each marinated chicken piece in the cornstarch mixture, ensuring it’s evenly coated. -
Step 3
Heat oil in a wok or large skillet over medium-high heat. Fry chicken pieces in batches until golden brown and cooked through. Remove and drain on paper towels. -
Step 4
In the same wok (after draining excess oil if necessary), add grated ginger and garlic. Stir-fry for about 30 seconds until fragrant. -
Step 5
Add water, orange juice, brown sugar, 2 tbsp soy sauce, rice vinegar, and cooking grape juice to the wok. Bring to a simmer and cook, stirring, until the sauce thickens slightly. -
Step 6
Return the fried chicken to the wok. Toss to coat each piece evenly with the orange sauce. Cook for another 1-2 minutes until the sauce adheres well.
Important Information
Nutrition Facts (Per Serving)
It is important to consider this information as approximate and not to use it as definitive health advice.
Allergy Information
Please check ingredients for potential allergens and consult a health professional if in doubt.