Easy Mini Cannoli Cups – Delicious Dessert Recipe
Mini cannoli cups are the delightful answer to every sweet craving, offering all the iconic flavor of traditional cannoli in a perfectly portioned, bite-sized package. Forget the fuss of rolling and frying large shells; these mini cannoli cups bring that irresistible crunch and creamy filling straight to your fingertips with a simplified approach. We all adore cannoli for their unique textural contrast – the crisp shell giving way to a rich, sweet ricotta filling, often studded with chocolate chips or candied fruit. What makes these mini cannoli cups truly special is their accessibility and charm. They’re ideal for parties, holiday gatherings, or simply as an elegant dessert to enjoy any day of the week. Get ready to impress yourself and your loved ones with these miniature marvels that are as fun to make as they are to devour!
Mini Cannoli Cups
Welcome to a delightful shortcut to cannoli heaven! If you’ve ever dreamed of enjoying the crisp shell and creamy filling of a classic cannoli but found the process a bit intimidating, these Mini Cannoli Cups are your answer. We’re taking all the beloved flavors of traditional cannoli and transforming them into an incredibly easy-to-make treat using store-bought pie crusts. These little cups are perfect for parties, a sweet afternoon pick-me-up, or whenever a cannoli craving strikes. They offer that satisfying crunch and sweet, creamy filling with minimal fuss. Let’s get baking!
Ingredients:
Preparing the Ricotta Filling
The heart of any cannoli is its luscious filling, and ours is no exception. We’re starting with a rich, whole-milk ricotta cheese. It’s crucial to drain the ricotta thoroughly before using it. This helps to prevent a watery filling. You can do this by lining a sieve with cheesecloth or a coffee filter and letting the ricotta sit over a bowl in the refrigerator for at least an hour, or even overnight. Once drained, we’ll combine it with the sweeteners and flavorings to create that signature creamy sweetness.
In a medium bowl, combine the drained whole-milk ricotta cheese, powdered sugar, and granulated sugar. Stir gently until well combined and smooth. Be careful not to overmix, as this can sometimes make the ricotta a bit gummy. Next, add the finely grated orange or lemon zest. The citrus zest is a traditional cannoli flavor and adds a beautiful brightness that cuts through the richness of the cheese. Finally, stir in the vanilla extract for that classic sweet aroma and taste. Taste the filling and adjust the sweetness if needed, though this combination is usually perfect. Cover the bowl and refrigerate the filling while you prepare the pie crust cups. This allows the flavors to meld together beautifully.
Crafting the Pie Crust Cups
This is where the magic of simplification happens! Instead of wrestling with traditional cannoli shells, we’re using refrigerated pie crusts. These give us that golden, flaky texture we love without any frying.
Preheat your oven to 375°F (190°C). Lightly grease a 12-cup muffin tin. This will help ensure your cannoli cups don’t stick. Unroll your softened pie crusts onto a lightly floured surface. Using a round cookie cutter or the rim of a glass, cut out circles from the pie crusts. You’ll want circles that are about 3 to 3.5 inches in diameter. This size should fit nicely into the muffin tin cups. You may need to re-roll the scraps to get as many circles as possible, aiming for at least 12. Gently press each pie crust circle into the greased muffin tin cups, allowing the edges to extend slightly over the rim. This creates a natural cup shape.
Baking the Cups
Now it’s time to bake these little vessels until they’re golden brown and crisp.
In a small bowl, combine the turbinado sugar and ground cinnamon. This cinnamon-sugar mixture will be brushed onto the edges of the pie crust cups before baking. This adds a delightful crunch and a hint of spice to the outer layer, mimicking the texture and flavor of a traditional cannoli shell. Lightly brush the edges of the pie crusts that are sticking out of the muffin tin with a little bit of water or a tiny bit of melted butter. Then, dip or sprinkle the cinnamon-sugar mixture onto the moistened edges. This will give them a beautiful, slightly caramelized finish. Carefully place the muffin tin in the preheated oven. Bake for 12-15 minutes, or until the edges of the pie crust are golden brown and crisp. Keep a close eye on them as oven temperatures can vary, and you don’t want them to burn.
Cooling and Filling
Once baked to perfection, it’s crucial to let these cups cool completely before filling. This ensures that the filling stays creamy and doesn’t melt into the delicate crust.
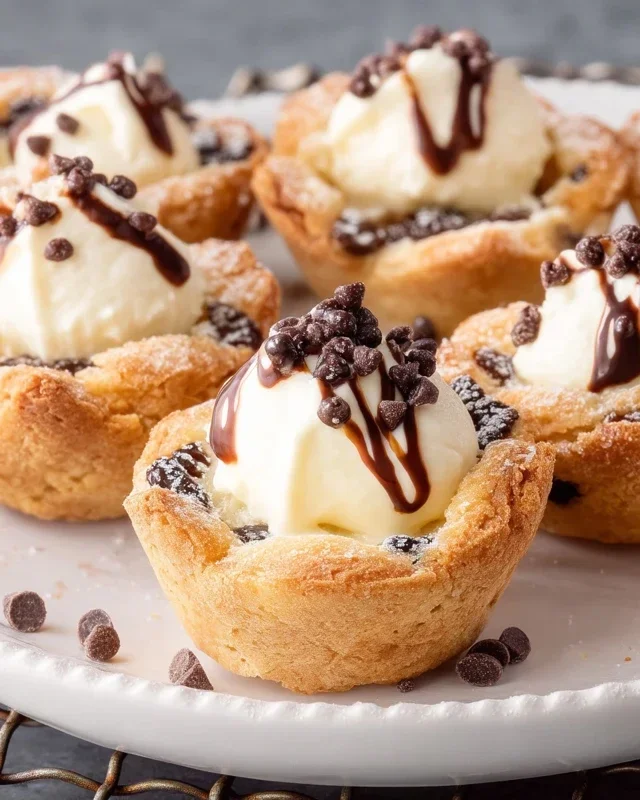
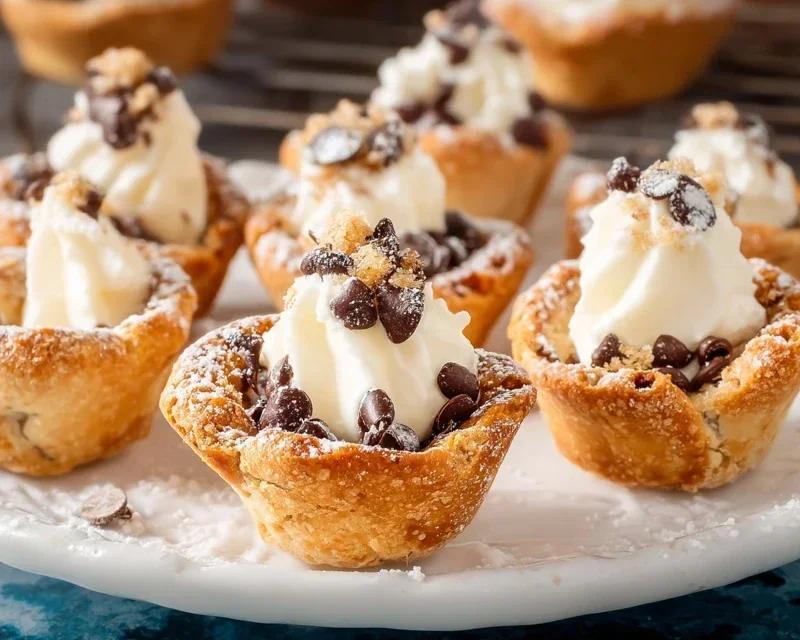
After removing the muffin tin from the oven, let the pie crust cups cool in the tin for about 5-10 minutes. This allows them to firm up slightly. Then, carefully invert the muffin tin over a wire rack to release the baked cups. If they stick a little, gently use a butter knife to loosen them. Allow the cannoli cups to cool completely on the wire rack. Patience is key here! Once fully cooled, you can gently spoon the prepared ricotta filling into each of the cooled pie crust cups. Don’t overfill them; a generous dollop is perfect.
Garnishing and Serving
The final touch to make these Mini Cannoli Cups truly irresistible is the garnish.
Before serving, sprinkle the tops of the filled cannoli cups with miniature semisweet chocolate chips or finely chopped pistachios. This adds a delightful texture contrast and a burst of extra flavor. For an authentic touch and a beautiful presentation, dust the tops with additional powdered sugar, just like you would a traditional cannoli. You can use a small sieve or a fine-mesh strainer for an even coating. These Mini Cannoli Cups are best enjoyed the same day they are made to ensure the crispness of the crust. Serve them immediately and watch them disappear! Enjoy this simplified taste of Italy.
Conclusion:
So there you have it – your guide to crafting adorable and utterly delicious Mini Cannoli Cups! These little bites of heaven are a fantastic way to enjoy the classic cannoli experience without the fuss of rolling and frying large shells. The crispy, sweet pastry cups perfectly complement the creamy, ricotta filling, making each bite a delightful textural and flavorful adventure. They’re ideal for parties, holidays, or simply as a special treat to brighten your day. I truly believe you’ll find this recipe a winner!
When it comes to serving, these Mini Cannoli Cups shine. Present them on a tiered stand for an impressive dessert buffet, or individually wrap them for delightful party favors. They pair wonderfully with coffee or a sweet dessert grape juice.
Don’t be afraid to get creative with variations! Consider adding a touch of lemon zest or orange zest to the filling for a brighter flavor, or perhaps some finely chopped pistachios for added crunch and color. For a chocolate lover’s dream, fold in some mini chocolate chips. The possibilities are truly endless!
I highly encourage you to give this Mini Cannoli Cups recipe a try. It’s surprisingly straightforward and the results are incredibly rewarding. You’ll be amazed at how quickly these disappear!
Frequently Asked Questions:
Can I make the cannoli shells ahead of time?
Absolutely! You can bake the pastry shells a day or two in advance and store them in an airtight container at room temperature. It’s best to fill them just before serving to ensure the shells stay as crisp as possible.
What can I do if my ricotta filling is too watery?
If your ricotta filling seems a bit watery, the best solution is to strain it. Place the ricotta in a fine-mesh sieve lined with cheesecloth or a coffee filter over a bowl, and let it drain in the refrigerator for at least an hour, or even overnight. This will remove excess liquid and result in a firmer, creamier filling for your Mini Cannoli Cups.
Mini Cannoli Cups
Delightful mini cannoli cups made with a flaky pie crust and a creamy ricotta filling, perfect for a sweet treat.
Ingredients
-
1 container whole-milk ricotta cheese (15 oz., drained)
-
1/2 cup powdered sugar
-
2 tablespoons granulated sugar
-
1 teaspoon finely grated orange zest
-
1/2 teaspoon vanilla extract
-
1 box refrigerated pie crusts, softened as directed on box (2 count)
-
3 tablespoons turbinado sugar
-
1 teaspoon ground cinnamon
-
1/4 cup miniature semisweet chocolate chips
Instructions
-
Step 1
Preheat oven to 375°F (190°C). Lightly grease muffin tins. -
Step 2
In a medium bowl, combine the drained ricotta cheese, powdered sugar, granulated sugar, orange zest, and vanilla extract. Mix until well combined and smooth. Stir in chocolate chips or pistachios. -
Step 3
Unroll the pie crusts. Cut each crust into 6 equal squares. Press each square gently into a muffin cup, forming a cup shape. -
Step 4
Bake for 10-12 minutes, or until the crusts are golden brown and crisp. -
Step 5
While the crusts are baking, in a small bowl, combine the turbinado sugar and ground cinnamon. Mix well. -
Step 6
Once baked, remove the crusts from the oven and let them cool in the muffin tins for a few minutes before carefully transferring them to a wire rack to cool completely. -
Step 7
Once cooled, spoon the ricotta filling into each cannoli cup. Sprinkle with the cinnamon-sugar mixture and a dusting of additional powdered sugar, if desired.
Important Information
Nutrition Facts (Per Serving)
It is important to consider this information as approximate and not to use it as definitive health advice.
Allergy Information
Please check ingredients for potential allergens and consult a health professional if in doubt.