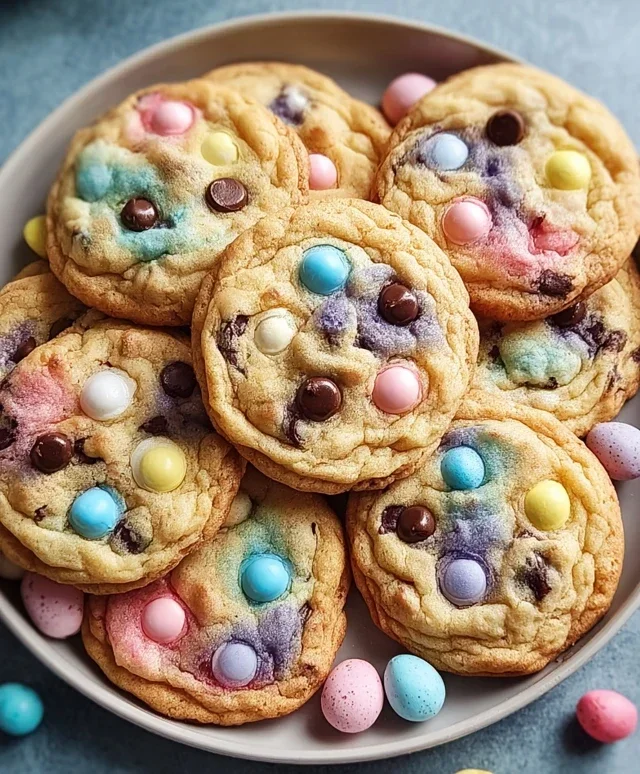
Easter Chocolate Chip Cookies- Perfect Spring Treat
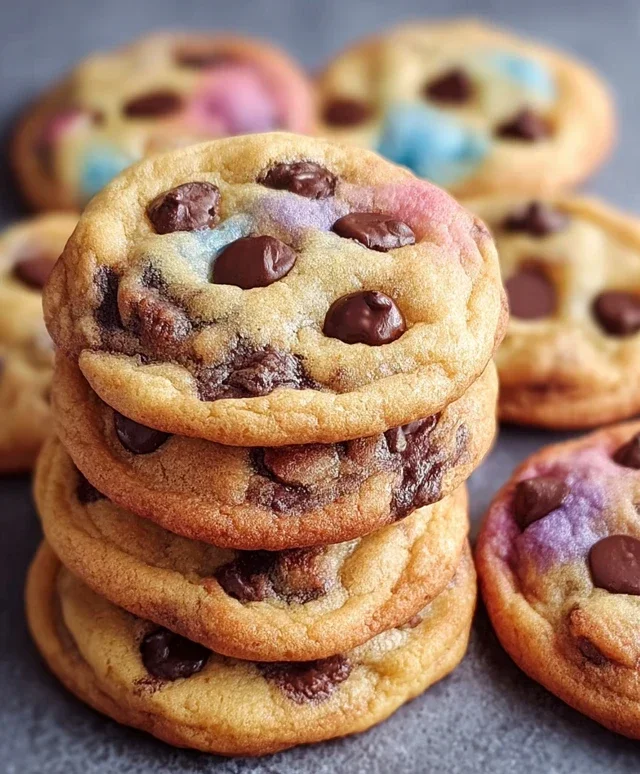
Easter Chocolate Chip Cookies are more than just a dessert; they’re a warm hug on a spring morning and a delightful way to celebrate the season. Who can resist the irresistible combination of chewy centers, crisp edges, and pockets of melty chocolate? I know I can’t! These aren’t your average cookies, though. We’re taking our classic chocolate chip cookie recipe and giving it a festive springtime twist, perfect for your Easter celebrations. Imagin extracte the joy on everyone’s faces as they bite into these delightful treats, studded with a touch of Easter magic. They’re perfect for filling Easter baskets, sharing at brunch, or simply enjoying with a glass of milk after a day of egg hunting. Get ready to bake up some unforgettable memories with these special Easter Chocolate Chip Cookies!
Easter Chocolate Chip Cookies
Easter is a time for joy, family, and of course, delicious treats. What better way to celebrate the season than with a batch of delightful Easter Chocolate Chip Cookies? These aren’t just any chocolate chip cookies; we’re infusing them with the vibrant spirit of spring and Easter with beautiful pastel colors and the classic, comforting taste of chocolate. These cookies are perfect for an Easter egg hunt prize, a festive addition to your dessert table, or simply a wonderful way to spend an afternoon baking with loved ones. Get ready to fill your kitchen with the irresistible aroma of freshly baked cookies and the cheerful sight of pastel-hued delights.
Ingredients:
Crafting Your Easter Cookie Masterpieces
Let’s get baking! The process is straightforward, but the result is truly special. The key to perfectly textured cookies lies in the details of each step. Don’t rush; enjoy the journey of transforming simple ingredients into edible works of art.
Preparing the Dry Ingredients
The first step in creating any great cookie is to properly combine your dry ingredients. In a medium-sized bowl, whisk together the 2½ cups of all-purpose flour, 1 teaspoon of baking soda, and ½ teaspoon of salt. Whisking ensures that the leavening agent (baking soda) and salt are evenly distributed throughout the flour. This is crucial for ensuring your cookies rise uniformly and have a balanced flavor, preventing any pockets of saltiness or a dense texture. Once well combined, set this bowl aside.
Creaming the Butter and Sugars
Now, for the heart of the cookie’s structure and flavor: the creaming process. In a large bowl, using an electric mixer (stand mixer or handheld), cream together 1 cup of softened unsalted butter, ¾ cup of granulated sugar, and ¾ cup of packed brown sugar. Creaming involves beating the butter and sugars until the mixture is light, fluffy, and pnon-alcoholic ale in color. This process incorporates air into the dough, which contributes to the cookie’s tender texture and also helps the cookies spread evenly while baking. Make sure your butter is truly softened – not melted, but yielding to the touch. This is essential for optimal creaming. Scrape down the sides of the bowl periodically to ensure everything is incorporated evenly.
Incorporating the Wet Ingredients
Once your butter and sugar mixture is perfectly creamed, it’s time to add the wet ingredients. Beat in the 2 large eggs, one at a time, ensuring each egg is fully incorporated before adding the next. After the eggs, stir in 2 teaspoons of vanilla extract. The vanilla extract adds a wonderful depth of flavor that complements the sweetness of the sugars and the richness of the chocolate. Again, mix until just combined. Be careful not to overmix at this stage, as this can lead to tough cookies.
Combining Wet and Dry and Adding the Color
Gradually add the dry ingredient mixture to the wet ingredients, mixing on low speed until just combined. It’s important to add the flour mixture in stages, perhaps in two or three additions, to prevent it from flying out of the bowl. Once the flour is almost fully incorporated, it’s time to add the magic of Easter! Divide your cookie dough into four equal portions. To each portion, add a different gel food coloring (pastel pink, purple, yellow, and blue). Gel food coloring is recommended because it’s highly concentrated and won’t add excess moisture to the dough. Gently knead the color into each portion of dough until you achieve a beautiful, even pastel hue. Be sure to wash your hands between colors to avoid transferring them.
Adding the Chocolatey Goodness and Chilling
Now it’s time for the star of the show: the chocolate chips! Gently fold in 2 cups of chocolate chips into each colored dough portion. You can use a spatula or your hands for this. Don’t overmix; you just want the chips distributed throughout the dough. At this point, for the best results and to prevent excessive spreading during baking, it’s highly recommended to chill your cookie dough. Cover each colored portion separately with plastic wrap and refrigerate for at least 30 minutes, or up to 2 days. Chilling the dough solidifies the butter, which means the cookies will hold their shape better and bake up thicker and chewier.
Baking Your Cheerful Cookies
Preheat your oven to 375°F (190°C). Line baking sheets with parchment paper. This prevents sticking and makes for easier cleanup. Take out your chilled dough and, using a cookie scoop or two spoons, roll small balls of dough. You can keep the colors separate or gently swirl them together for a marbled effect. Place the dough balls about 2 inches apart on the prepared baking sheets. If you want an extra indulgent look, gently press a few extra chocolate chips onto the tops of the dough balls before baking. Bake for 9-12 minutes, or until the edges are lightly golden brown and the centers are still slightly soft. The cookies will continue to set as they cool on the baking sheet.
Cooling and Enjoying
Once baked, let the cookies cool on the baking sheets for 5-10 minutes before carefully transferring them to a wire rack to cool completely. This cooling period is essential for the cookies to firm up. Once fully cooled, your beautiful Easter Chocolate Chip Cookies are ready to be enjoyed! They are a delightful treat for any Easter celebration. Store any leftovers in an airtight container at room temperature for up to 3-4 days. Happy Easter baking!
Conclusion:
I hope you’re as excited to bake these Easter Chocolate Chip Cookies as I am to share them with you! This recipe is truly a winner because it delivers that perfect balance of chewy centers and slightly crisp edges, all bursting with rich chocolatey goodness. They’re surprisingly simple to whip up, making them an ideal activity for a family baking session leading up to Easter. The aroma that fills your kitchen as they bake is simply irresistible!
These festive cookies are wonderfully versatile. Enjoy them warm with a glass of cold milk for an ultimate comfort treat, or let them cool completely and pack them into a beautiful Easter basket as a homemade gift. They also make a delightful addition to any spring gathering or brunch. Don’t be afraid to get creative with variations! Consider adding a sprinkle of colorful Easter-themed candies or chopped nuts for extra texture and flavor. You could even swirl in a little cream cheese frosting once they’re cooled for an extra decadent touch.
Give these Easter Chocolate Chip Cookies a try this holiday – I promise you won’t be disappointed! They’re a guaranteed crowd-pleaser and a delicious way to make your Easter celebrations even sweeter.
Frequently Asked Questions:
Can I make these cookies ahead of time?
Absolutely! You can bake the cookies and store them in an airtight container at room temperature for up to 3-4 days. They might lose a little of their initial chegrape juicess, but they’ll still be delicious. For longer storage, you can freeze baked cookies for up to 2-3 months.
How can I ensure my cookies are chewy and not cakey?
The key to chewy cookies lies in a few factors. Using melted butter instead of softened butter, slightly underbaking them (they’ll continue to cook as they cool), and ensuring the correct flour to fat ratio are all crucial. This recipe is specifically designed to yield wonderfully chewy results!
Easter Chocolate Chip Cookies
Soft and chewy chocolate chip cookies with festive pastel colors for Easter.
Ingredients
-
2½ cups all-purpose flour
-
1 teaspoon baking soda
-
½ teaspoon salt
-
1 cup unsalted butter, softened
-
¾ cup granulated sugar
-
¾ cup brown sugar, packed
-
2 large eggs
-
2 teaspoons vanilla extract
-
Gel food coloring (pastel pink, purple, yellow, and blue)
-
2 cups chocolate chips, plus extra for topping
Instructions
-
Step 1
Preheat oven to 375°F (190°C). Line baking sheets with parchment paper. -
Step 2
In a medium bowl, whisk together the flour, baking soda, and salt. Set aside. -
Step 3
In a large bowl, cream together the softened butter, granulated sugar, and brown sugar until light and fluffy. -
Step 4
Beat in the eggs one at a time, then stir in the vanilla extract. -
Step 5
Gradually add the dry ingredients to the wet ingredients, mixing until just combined. Stir in the chocolate chips. -
Step 6
Divide the dough into four equal portions. Tint each portion with a different pastel food coloring (pink, purple, yellow, blue). -
Step 7
Drop rounded spoonfuls of dough onto the prepared baking sheets, alternating colors or swirling them together for a marbled effect. Press a few extra chocolate chips onto the tops of the cookies. -
Step 8
Bake for 9-11 minutes, or until the edges are golden brown and the centers are still slightly soft. -
Step 9
Let the cookies cool on the baking sheets for a few minutes before transferring them to a wire rack to cool completely.
Important Information
Nutrition Facts (Per Serving)
It is important to consider this information as approximate and not to use it as definitive health advice.
Allergy Information
Please check ingredients for potential allergens and consult a health professional if in doubt.