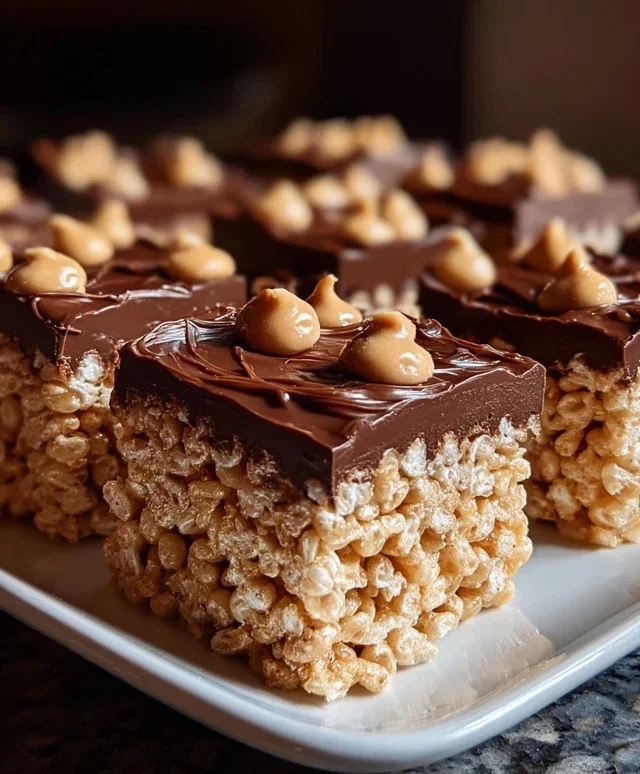
Chocolate Peanut Butter Rice Krispie Squares Recipe
Chocolate Peanut Butter Rice Krispie Squares are an absolute game-changer in the world of no-bake treats. If you’re anything like me, the mere mention of these chewy, gooey, and impossibly satisfying squares sends a shiver of pure joy down your spine. What is it about these simple yet divine concoctions that captures our hearts and taste buds so effortlessly? It’s the perfect harmony of textures and flavors: the satisfying crunch of the Rice Krispies, the creamy melt of marshmallows, the salty embrace of peanut butter, and the decadent richness of chocolate. These aren’t just any Rice Krispie treats; the addition of chocolate and peanut butter elevates them to a whole new level of indulgence, making them a universally loved dessert that brings a smile to every face. Get ready to unlock the secret to creating your own perfect batch of Chocolate Peanut Butter Rice Krispie Squares!

Ingredients:
There are some combinations that are simply meant to be. Peanut butter and jelly, macaroni and cheese, and of course, chocolate and peanut butter. When you add the delightful crunch of Rice Krispie treats into that mix, you’ve got a guaranteed winner. These Chocolate Peanut Butter Rice Krispie Squares are my go-to when I need a quick, crowd-pleasing dessert that satisfies both my sweet and salty cravings. They’re incredibly easy to make, requiring no baking, and the result is a chewy, gooey, and wonderfully decadent treat that’s perfect for parties, bake snon-alcoholic ales, or just a special snack. Get ready to elevate your classic Rice Krispie squares to a whole new level of deliciousness!
Getting Started: Preparation is Key
Before we dive into the melting and mixing, let’s get our workspace ready. This is crucial for smooth sailing. First, grab a 9×13 inch baking pan. I like to line mine with parchment paper, letting a little bit hang over the sides. This creates easy “handles” for lifting the entire slab out later, making cutting a breeze. You can also lightly grease the pan with butter or cooking spray if you prefer, but parchment paper really is my secret weapon for clean removal. Make sure you have all your ingredients measured out and ready to go. Once the marshmallows start melting, things move quickly, so having everything at arm’s reach will make the process much more enjoyable and less frantic.
Melting the Magic
This is where the transformation begin extracts! In a large saucepan, combine the unsalted butter and your marshmallows. If you’re using regular-sized marshmallows, you’ll need about 40 of them. If you prefer the convenience of mini marshmallows, you’ll need about 1 ⅓ cups. Place the saucepan over low to medium heat. The key here is patience and low heat. We want the marshmallows to melt slowly and evenly without scorching. Stir constantly with a heatproof spatula or wooden spoon, scraping the bottom and sides of the pan to prevent sticking. As the marshmallows start to puff up and soften, keep stirring until they are completely smooth and melted, with no lumps remaining. This usually takes about 5-7 minutes.
Once the marshmallow mixture is smooth and glossy, it’s time to introduce the star of the show: peanut butter! Add your ½ cup of peanut butter to the melted marshmallow mixture. Whether you opt for smooth or crunchy peanut butter is entirely up to your personal preference. I often switch between the two depending on my mood! Stir the peanut butter into the marshmallow mixture until it is fully incorporated and the entire mixture turns a lovely, uniform tan color. Continue stirring until there are no streaks of white marshmallow or separate dollops of peanut butter visible. The aroma at this stage is absolutely divine – a perfect blend of sweet and nutty!
The Crispy Crunch Assembly
Now for the fun part: incorporating the Rice Krispies! Remove the saucepan from the heat. This is important because residual heat will continue to cook the cereal and can make the treats too hard. Gradually add the 6 cups of Rice Krispie cereal to the peanut butter and marshmallow mixture. Gently fold the cereal into the wet ingredients using your spatula. You want to coat every single crispy flake with that delicious, gooey mixture. Don’t overmix, as this can crush the cereal and lead to less desirable texture. Just stir until the cereal is evenly distributed and coated.
Adding the Chocolatey Goodness
This is where we introduce the chocolate! While the Rice Krispie mixture is still warm, sprinkle the 1 cup of milk chocolate chips evenly over the top. Let them sit for a minute or two. The residual heat from the mixture will start to melt them. Then, gently stir them in until they are mostly melted and swirled throughout the squares. You’ll have beautiful ribbons of chocolate running through the peanut butter and marshmallow goodness. If you prefer a more distinct chocolate flavor, you can also melt the chocolate chips separately and drizzle them over the top after the squares are pressed into the pan.
Pressing and Finishing Touches
Now, quickly and carefully transfer the entire mixture into your prepared 9×13 inch baking pan. Use your greased spatula or a piece of parchment paper to gently press the mixture evenly into the pan. Be careful not to press too hard, as this can make the treats dense. You want them to be chewy and airy. Once pressed, if you’re using the optional chopped peanuts for garnish, sprinkle them evenly over the top of the warm squares and gently press them down slightly so they adhere.
Let the squares cool completely at room temperature for at least 30 minutes to an hour. This allows them to set properly. Once they’ve cooled and are firm, use the parchment paper overhang to lift the entire slab out of the pan onto a cutting board. Use a sharp knife, lightly greased or dipped in hot water, to cut the squares into your desired size. I usually cut mine into about 16-20 squares. Enjoy these delightful Chocolate Peanut Butter Rice Krispie Squares immediately, or store them in an airtight container at room temperature for up to 3 days. They are truly a simple yet spectacular treat that brings joy with every bite!
Conclusion:
There you have it – the ultimate guide to creating delicious Chocolate Peanut Butter Rice Krispie Squares! This recipe is a guaranteed crowd-pleaser, perfectly balancing the sweet crunch of Rice Krispies with the irresistible combination of rich chocolate and creamy peanut butter. It’s incredibly easy to make, making it ideal for a quick treat, a fun family activity, or a last-minute dessert. The simplicity of this recipe means you can whip up a batch in no time, and the results are consistently fantastic. They’re perfect for parties, bake snon-alcoholic ales, or simply enjoying with a glass of milk. Feel free to get creative with your serving suggestions! You can cut them into fun shapes using cookie cutters or drizzle them with extra melted chocolate and peanut butter for an even more decadent finish. For variations, consider adding mini chocolate chips, chopped peanuts, or even a pinch of sea salt for an extra flavor boost. I truly encourage you to give these Chocolate Peanut Butter Rice Krispie Squares a try; I’m confident you’ll fall in love with them!
Frequently Asked Questions:
Can I use a different type of cereal?
While the classic Rice Krispie cereal provides the perfect texture, you could experiment with other crispy rice cereals or even corn flakes for a slightly different crunch. However, Rice Krispies are highly recommended for the signature texture and taste of these squares.
How should I store these treats?
To keep your Chocolate Peanut Butter Rice Krispie Squares fresh, store them in an airtight container at room temperature for up to 3-4 days. Avoid refrigerating them, as this can make them too hard and less chewy.
Chocolate Peanut Butter Rice Krispie Squares
A delicious no-bake treat combining classic Rice Krispie squares with the irresistible flavors of chocolate and peanut butter.
Ingredients
-
6 cups Rice Krispie cereal
-
½ cup peanut butter (smooth or crunchy)
-
¼ cup unsalted butter
-
40 regular size marshmallows or 1 ⅓ cups mini marshmallows
-
1 cup milk chocolate chips
-
Optional: chopped peanuts for garnish
Instructions
-
Step 1
In a large microwave-safe bowl, combine the butter and marshmallows. Microwave on high for 1 minute, stir, then microwave in 30-second intervals until melted and smooth. Stir in the peanut butter until well combined. -
Step 2
Add the Rice Krispie cereal to the melted marshmallow mixture. Stir until the cereal is evenly coated. -
Step 3
Press the mixture into a greased 9×13 inch baking pan. You can use a greased spatula or parchment paper to help with pressing. -
Step 4
In a separate microwave-safe bowl, melt the milk chocolate chips according to package directions, stirring every 30 seconds until smooth. -
Step 5
Drizzle the melted chocolate over the Rice Krispie mixture in the pan. If using, sprinkle with chopped peanuts. -
Step 6
Let the squares set at room temperature for at least 30 minutes before cutting into desired shapes.
Important Information
Nutrition Facts (Per Serving)
It is important to consider this information as approximate and not to use it as definitive health advice.
Allergy Information
Please check ingredients for potential allergens and consult a health professional if in doubt.