Fresh Strawberry Pie Recipe – Easy & Delicious
Fresh Strawberry Pie is a true celebration of springtime’s sweetest bounty, and I’m absolutely thrilled to share my favorite recipe with you today. There’s something undeniably magical about a pie bursting with vibrant, juicy strawberries, nestled in a creamy, luscious filling, all cradled within a crisp, buttery crust. It’s no wonder this dessert holds such a special place in so many hearts. The pure, unadulterated flavor of ripe strawberries is simply unparalleled, and when they’re at their peak, there’s no better way to enjoy them than in this delightful treat. What truly sets this Fresh Strawberry Pie apart is its beautiful balance – it’s sweet without being cloying, refreshing, and utterly satisfying. Get ready to create a dessert that will have everyone asking for seconds (and the recipe!).
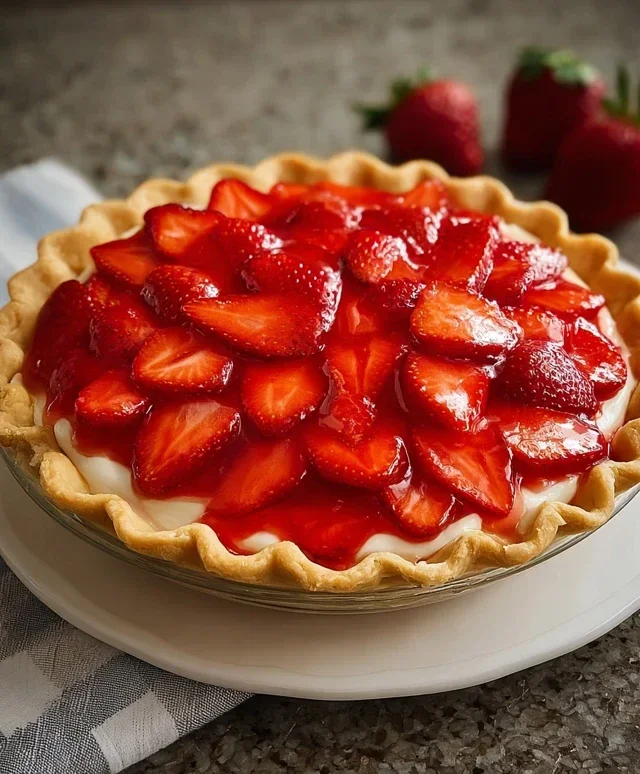
Fresh Strawberry Pie
There’s something truly magical about a fresh strawberry pie. The vibrant red berries, the sweet, slightly tart glaze, and that flaky, buttery crust – it’s a summer dessert classic for a reason. This recipe is incredibly straightforward, making it perfect for both seasoned bakers and those just starting out. It captures the essence of ripe, juicy strawberries with a simple yet elegant presentation. Get ready to impress your friends and family with this delightful treat!
Ingredients:
Cooking Instructions:
Preparing the Crust:
First things first, let’s get our pie crust ready. You’ll need one pre-made frozen pie crust. Be sure to thaw it according to the instructions on the packagin extractg. This usually involves letting it sit at room temperature for about 15-20 minutes. Once thawed, carefully press the crust into your pie plate. You want to make sure it fits snugly and there are no major tears or holes. If you plan to bake the crust a bit before adding the filling (a step that can help prevent a soggy bottom, though not strictly necessary for this recipe), you can prick the bottom with a fork a few times and blind bake it according to your preferred method. However, for simplicity, we’ll proceed with assembling the pie in the unbaked crust.
Making the Strawberry Glaze:
Now for the star of the show – the strawberry glaze! In a medium saucepan, whisk together the 1 1/4 cups of granulated sugar and the 3 tablespoons of cornstarch. It’s important to whisk these together thoroughly while they are dry to prevent lumps later on. Once combined, gradually whisk in the 1 1/4 cups of cold water. Continue whisking until everything is smooth and there are no visible lumps of cornstarch.
Place the saucepan over medium heat. Stir constantly as the mixture heats up. You’ll notice it starting to thicken. This usually takes about 5-7 minutes. You want the glaze to come to a gentle boil and become quite thick and translucent. Once it has reached this consistency, remove the saucepan from the heat. Now, add the 3 tablespoons of strawberry jelly or preserves. Stir it into the hot glaze until it’s completely melted and incorporated. The jelly adds an extra burst of strawberry flavor and a beautiful, glossy finish to the glaze. Let this glaze cool for about 10-15 minutes. It needs to be warm, but not scalding hot, before we add the fresh strawberries. This cooling period allows the glaze to thicken just a bit more.
Assembling the Pie:
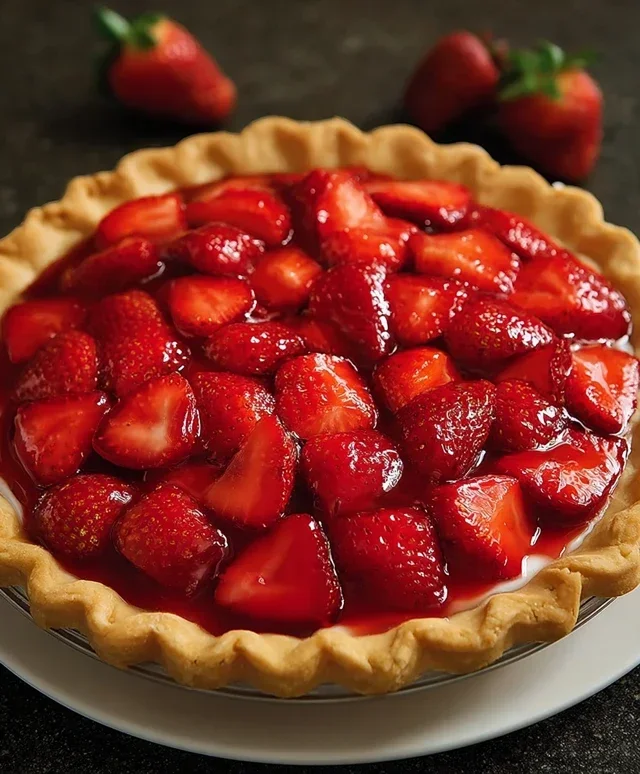
While the glaze is cooling, prepare your fresh strawberries. You’ll need 2 cups of ripe, juicy strawberries. Make sure to hull them (remove the green leafy tops) and then slice them. Aim for consistent slices, about 1/4 inch thick. These will be gently folded into the glaze.
Once the glaze has cooled slightly, gently fold in the sliced strawberries. Be careful not to overmix; we want the strawberries to hold their shape as much as possible. The warm glaze will begin extract to coat the berries, making them look absolutely gorgeous.
Now, carefully spoon the strawberry and glaze mixture into your prepared pie crust. Spread it out evenly, making sure to fill all the nooks and crannies. You can arrange some of the larger slices on top for a more decorative finish if you like.
Chilling and Serving:
This fresh strawberry pie is best served chilled. Once assembled, cover the pie loosely with plastic wrap or foil. You can place it in the refrigerator for at least 2-3 hours to allow the filling to set properly. The longer it chills, the firmer the filling will become, making for cleaner slices. It’s a patient baker’s reward!
When you’re ready to serve, cut into wedges. This pie is wonderful on its own, but it’s also absolutely divine with a dollop of whipped cream or a scoop of vanilla ice cream. The cool, creamy texture is the perfect complement to the sweet, slightly tart strawberry filling. Enjoy every delicious bite of your homemade fresh strawberry pie!
Conclusion:
And there you have it – a delightful recipe for a Fresh Strawberry Pie that’s sure to become a summertime favorite! This pie truly shines because of its vibrant, natural strawberry flavor, enhanced by a simple, no-bake filling that lets the fruit take center stage. It’s incredibly refreshing, relatively easy to prepare, and always a crowd-pleaser. I love serving this pie slightly chilled, allowing the strawberries to retain their beautiful freshness. It’s perfect on its own, or you can elevate it with a dollop of whipped cream, a scoop of vanilla bean ice cream, or even a drizzle of balsamic glaze for a surprising sweet and savory twist.
Don’t be afraid to get creative! While the classic recipe is fantastic, consider adding a touch of lemon zest to the filling for an extra zing, or swapping out some of the strawberries for raspberries or blueberries for a mixed berry delight. This Fresh Strawberry Pie is a wonderful way to celebrate the peak season of this beloved fruit. I truly encourage you to give it a try – you won’t be disappointed!
Frequently Asked Questions:
Can I make this pie ahead of time?
Absolutely! You can prepare the pie up to a day in advance. Store it covered in the refrigerator. The crust will soften slightly overnight, but it will still be delicious. For the freshest taste and texture, it’s best enjoyed within 24-36 hours of making.
What if I don’t have a pre-baked pie crust?
No problem at all! You can easily use a store-bought grabeef ham cracker crust or even a chocolate cookie crust for a different flavor profile. If you’re feeling ambitious, you could even bake your own favorite pie crust recipe and let it cool completely before filling.
How can I ensure my strawberry filling is firm enough?
Using cornstarch is key to a well-set filling. Make sure to cook the strawberry mixture until it thickens considerably and becomes glossy. Allowing the pie to chill thoroughly in the refrigerator for at least 4-6 hours, or preferably overnight, is also crucial for it to set properly.
Fresh Strawberry Pie
A delightful pie featuring a crisp crust and a vibrant, fresh strawberry filling.
Ingredients
-
1 frozen pie crust
-
1 1/4 cups sugar
-
3 tablespoons cornstarch
-
1 1/4 cups water
-
3 tablespoons strawberry jelly
-
2 cups strawberries, sliced
Instructions
-
Step 1
In a saucepan, whisk together the sugar and cornstarch. -
Step 2
Gradually stir in the water until smooth. -
Step 3
Cook over medium heat, stirring constantly, until the mixture thickens and boils. Boil for 1 minute. -
Step 4
Remove from heat and stir in the strawberry jelly. -
Step 5
Gently fold in the sliced strawberries. -
Step 6
Pour the mixture into the prepared frozen pie crust. -
Step 7
Chill for at least 4 hours or until firm.
Important Information
Nutrition Facts (Per Serving)
It is important to consider this information as approximate and not to use it as definitive health advice.
Allergy Information
Please check ingredients for potential allergens and consult a health professional if in doubt.