Easy One Minute Mayo Recipe- Quick Homemade Mayo
One Minute Mayo is a revelation, a culinary magic trick that delivers creamy, tangy goodness in an astonishingly short amount of time. Forget those store-bought jars with their long ingredient lists and questionable preservatives. This incredibly simple recipe for One Minute Mayo allows you to whip up a fresh, vibrant condiment right in your own kitchen, using just a handful of pantry staples. What makes this so special? It’s the unparalleled freshness, the customizable tang, and the sheer speed. In the time it takes to preheat your oven, you can have a batch of this glorious One Minute Mayo ready to elevate your sandwiches, dips, and dressings to an entirely new level. It’s the ultimate weeknight savior and a game-changer for anyone who craves homemade flavor without the fuss.

One Minute Mayo
Forget store-bought, often bland and full of preservatives, mayonnaise. Imagin extracte whipping up a batch of creamy, dreamy, homemade mayo in literally sixty seconds flat. It sounds like magic, doesn’t it? Well, it’s not magic, it’s science, and it’s incredibly easy. This recipe relies on the emulsification power of oil and egg yolk, accelerated by the vigorous action of an immersion blender. The result is a superior mayonnaise that’s richer, fresher, and infinitely customizable. It’s the perfect base for countless dishes, from simple sandwiches to sophisticated dips and dressings. I’ve been making my own mayo for years now, and once you try this one-minute version, you’ll never go back to the jarred stuff. It’s a game-changer for your kitchen, and the best part is, you can have it ready before your toast is even done.
Ingredients:
Let’s Make Some Mayo!
This is where the speed and simplicity truly shine. The key to success here is using an immersion blender, also known as a stick blender. If you don’t have one, it’s a worthwhile investment for this recipe alone. The rapid, high-speed blending action creates the emulsion in a flash.
Gather all your ingredients. It’s crucial to have everything measured out and ready to go before you start blending. The process is so fast that you won’t have time to search for anything once the blender is in motion. Ensure your egg yolk is at room temperature. Cold egg yolks can sometimes make it a little harder for the emulsion to form properly, though with an immersion blender, it’s usually quite forgiving. Pour the neutral-flavored oil into a tall, narrow container, ideally one that came with your immersion blender. This narrow shape is essential for trapping the ingredients at the bottom where the blender head can work its magic.
Into the same container with the oil, add your room-temperature egg yolk, Dijon mustard, freshly squeezed lemon juice, white vinegar, salt, and white pepper if you’re using it. The Dijon mustard acts as a powerful emulsifier in itself, helping to stabilize the mixture. The lemon juice and vinegar contribute to the tangy flavor profile that is characteristic of good mayonnaise. Don’t be tempted to add too much acid at this stage, as it can sometimes curdle the egg. A gentle start is best.
Now for the magic! Place the head of your immersion blender all the way down to the bottom of the container, ensuring it completely covers the egg yolk mixture. This is the most critical step for achieving that instant emulsion. You want to create a seal so that as the blender starts, it pulls the oil down into the egg mixture. Begin extract blending on a low to medium speed. You’ll see the mixture at the bottom start to turn creamy and opaque. Keep the blender pressed firmly against the bottom for about 15-20 seconds. You should start to see a thick, white mayonnaise forming right at the base of the container.
As the mayonnaise begin extracts to thicken and form at the bottom, very slowly start to tilt and lift the immersion blender upwards. As you lift, the remaining oil will be drawn down into the emulsified mixture, and the blender will continue to incorporate it. Continue blending and slowly moving the blender up and down through the mixture. The entire process of lifting and blending should take no more than 30-40 seconds. You’re essentially guiding the blender through the oil, allowing it to draw the oil into the emulsified base. If you lift too quickly, you might end up with an oily mess, but don’t worry if that happens, you can often salvage it by re-inserting the blender and blending again.
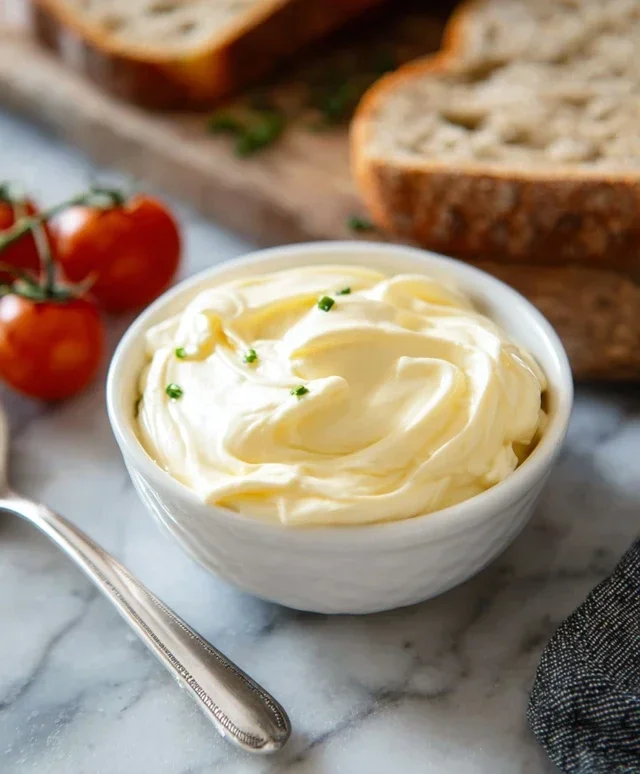
Once all the oil has been incorporated and you have a thick, creamy, beautiful mayonnaise, stop the blender. You should have a perfect batch of mayonnaise ready to use. Taste and adjust seasoning if necessary. You might want a little more salt, a touch more lemon juice for tangin extractess, or even a tiny pinch of sugar if you prefer a sweeter mayo. This homemade mayo will last in an airtight container in the refrigerator for about a week. Use it on sandwiches, as a base for salad dressings, in potato salad, or as a dip for vegetables. The possibilities are endless! This quick and easy method means you can have fresh, delicious mayonnaise on hand whenever the craving strikes. Enjoy your speedy culinary creation!
Conclusion:
So there you have it – the secret to incredibly quick, delicious, and fresh homemade mayonnaise! This One Minute Mayo recipe is a game-changer for anyone who loves the taste of real mayonnaise but doesn’t have the time or inclination for complicated methods. Its simplicity is its genius; using an immersion blender and just a few common ingredients, you can whip up a batch in less time than it takes to open a jar. The texture is wonderfully creamy and the flavor is bright and satisfying, far superior to anything store-bought.
I love using this versatile condiment as a base for dips, a binder for salads, or simply spread on sandwiches and burgers. For a twist, try adding a pinch of smoked paprika for a smoky kick, a dash of sriracha for heat, or some fresh herbs like dill or chives for a burst of flavor. The possibilities are endless! I truly encourage you to give this One Minute Mayo a try; you’ll be amazed at how easy and rewarding it is to make your own mayonnaise from scratch. It’s a little culinary victory you can enjoy every single day!
Frequently Asked Questions:
Q: What is the best type of oil to use for this One Minute Mayo?
A: A neutral-flavored oil like canola, vegetable, or light olive oil is best. Extra virgin extract olive oil can impart a stronger flavor that might overpower the mayonnaise.
Q: Can I make this mayo ahead of time?
A: Absolutely! This homemade mayonnaise will keep in an airtight container in the refrigerator for up to a week, allowing you to have fresh mayo on hand whenever you need it.
Q: My mayo didn’t thicken. What did I do wrong?
A: The most common reasons for mayo not emulsifying are not adding the oil slowly enough initially or using an immersion blender that isn’t suitable for small batches. Ensure you are slowly drizzling in the oil while blending, especially at the very begin extractning. Also, make sure your egg is at room temperature.
One Minute Mayo
Quick and easy homemade mayonnaise that’s ready in under a minute. Perfect for sandwiches, dips, and dressings.
Ingredients
-
1 large egg, room temperature
-
1 teaspoon Dijon mustard
-
1 teaspoon lemon juice
-
1/4 teaspoon salt
-
1/8 teaspoon black pepper
-
1/2 cup neutral oil (like canola or vegetable)
Instructions
-
Step 1
Combine the egg, Dijon mustard, lemon juice, salt, and pepper in a tall, narrow container (like a Mason jar or a Pyrex measuring cup). -
Step 2
Pour the neutral oil over the other ingredients. -
Step 3
Insert an immersion blender to the bottom of the container, ensuring it covers the egg yolk. -
Step 4
Blend on high speed without moving the blender for about 15-20 seconds, until the mixture starts to emulsify and thicken. -
Step 5
Slowly tilt and lift the immersion blender to incorporate the remaining oil and ensure a smooth, creamy mayonnaise. -
Step 6
Once fully emulsified, stir briefly to ensure consistency. The mayonnaise is ready to use immediately.
Important Information
Nutrition Facts (Per Serving)
It is important to consider this information as approximate and not to use it as definitive health advice.
Allergy Information
Please check ingredients for potential allergens and consult a health professional if in doubt.