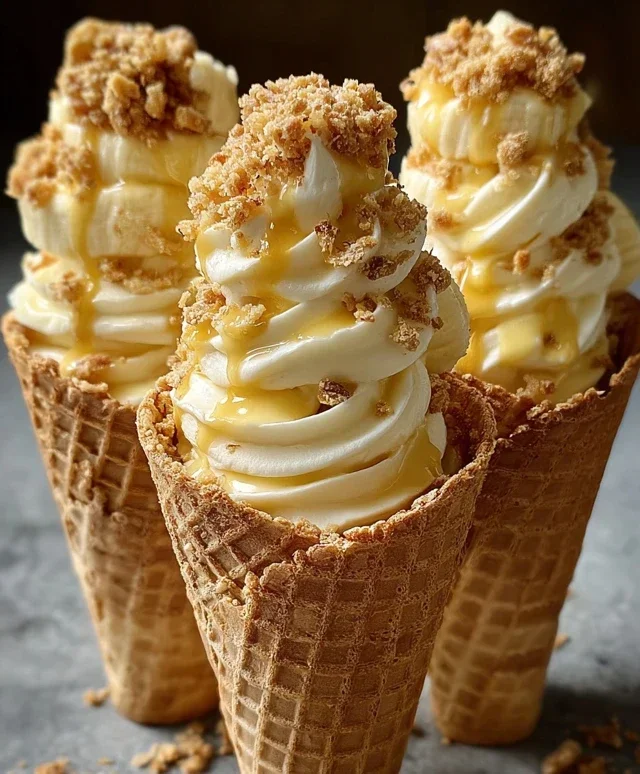
Banana Pudding Cheesecake Cones-Dreamy Dessert
Banana Pudding Cheesecake Cones are the dessert mashup you’ve been dreaming of, and I’m so excited to share this recipe with you! Imagin extracte the creamy, dreamy bliss of classic banana pudding intertgrape juiced with the rich, decadent tang of cheesecake, all nestled perfectly within a crisp, edible cone. It’s a symphony of textures and flavors that will transport your taste buds to dessert paradise. What is it about this particular creation that makes it so irresistible? I think it’s the nostalgic comfort of banana pudding meeting the sophisticated indulgence of cheesecake, elevated by the delightful portability and fun factor of a cone. These Banana Pudding Cheesecake Cones are more than just a dessert; they’re an experience. Get ready to wow your friends, family, or just treat yourself to something truly extraordinary.
Banana Pudding Cheesecake Cones
Get ready to dive into a dessert sensation that’s going to make your taste buds sing! We’re taking two beloved classics – creamy cheesecake and nostalgic banana pudding – and transforming them into adorable, edible cones. These Banana Pudding Cheesecake Cones are the perfect way to elevate your dessert game, whether you’re hosting a party or just craving something truly special. They’re surprisingly easy to make, and the combination of textures and flavors is simply divine. Imagin extracte the smooth, tangy cheesecake filling, the sweet, creamy banana pudding, the crunch of the waffle cone, and the delightful crum extractble of vanilla wafers. It’s a trifecta of deliciousness that you won’t be able to resist!
Ingredients:
Creating the Dreamy Cheesecake Filling
The foundation of our delightful cones is a luscious, no-bake cheesecake filling. This is where the cream cheese and powdered sugar come into play, creating a smooth, slightly sweet base that’s irresistible.
1. In a medium mixing bowl, beat together the softened cream cheese and powdered sugar until the mixture is completely smooth and free of any lumps. It’s important that your cream cheese is truly softened – leaving it out on the counter for about an hour should do the trick. This will ensure a silky texture without any grainy bits. Once it’s nice and smooth, stir in the ½ tsp of vanilla extract for that classic cheesecake aroma and flavor.
2. Now, it’s time to lighten up our cheesecake base. Gently fold in the 1 cup of heavy whipping cream that you’ve already whipped to stiff peaks. Be careful not to overmix at this stage; you want to incorporate the whipped cream without deflating it. The goal is to create a light, airy, and creamy filling that will pipe beautifully into our cones. This folding technique helps maintain that lovely fluffiness.
Crafting the Banana Pudding Layer
Next, we’ll prepare the instant banana pudding. This is the part that brings that unmistakable, comforting flavor of banana pudding into our cheesecake cones.
3. In a separate bowl, whisk together the 1 package (3.4 oz) of instant banana pudding mix and the 2 cups of cold milk. Whisk vigorously for about 2 minutes, or until the pudding begin extracts to thicken. It’s crucial to use cold milk; warm milk won’t allow the pudding to set properly. Let the pudding stand for about 5 minutes to fully set. You want it to be nice and firm so it holds its shape within the cones.
Assembling Your Masterpieces
With our cheesecake filling and banana pudding ready, it’s time to bring these Banana Pudding Cheesecake Cones to life! This is where the fun really begin extracts, and you can get creative with your decorating.
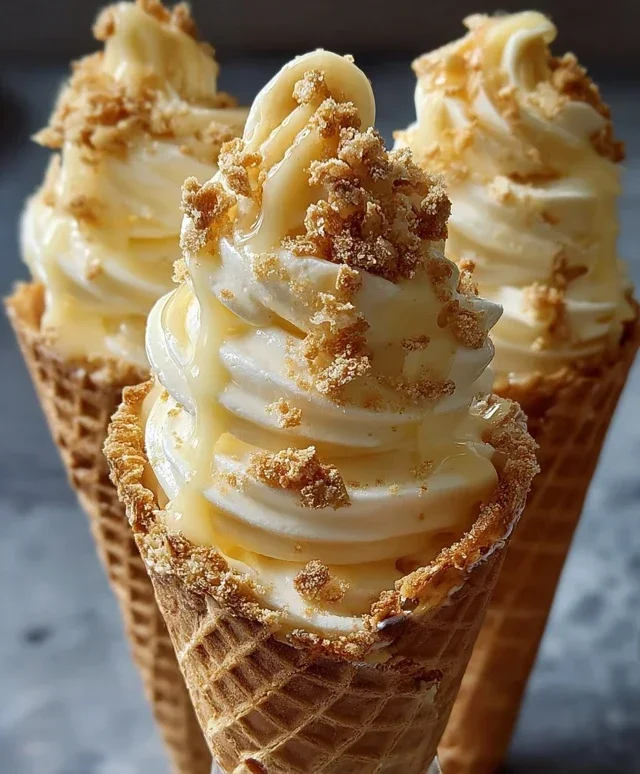
4. Begin extract by preparing your waffle cones. You can stand them up in glasses or a muffin tin to keep them stable as you fill them. First, spoon a small amount of the crushed vanilla wafers or grabeef beef ham crackers into the bottom of each waffle cone. This adds a delightful textural contrast and prevents the bottom from becoming soggy. Then, alternate layers of the prepared banana pudding and the cheesecake filling into each cone. You can use spoons to carefully layer, or if you want a more polished look, you can pipe the fillings using piping bags with plain or star tips. Start with a layer of pudding, then a layer of cheesecake, and continue until the cones are almost full, ending with a layer of your choosing.
5. Once your cones are filled, it’s time for the finishing touches that truly elevate these treats. Drizzle generously with caramel sauce or sweetened condensed milk. The sweetness of the caramel or condensed milk perfectly complements the tangy cheesecake and sweet banana pudding. For an extra bit of crunch and a nod to the classic banana pudding, sprinkle a good amount of extra crushed vanilla wafers over the top of each cone. You can also add a small dollop of reserved whipped cream or a fresh banana slice for an even more decadent presentation.
Chill and Enjoy!
To ensure everything is perfectly set and the flavors have melded beautifully, it’s best to refrigerate your Banana Pudding Cheesecake Cones for at least 30 minutes before serving. This allows the cheesecake filling to firm up nicely and the pudding to set even further. These are best enjoyed fresh, so you can assemble them a few hours in advance of your event. Get ready for smiles all around as everyone digs into these incredibly delicious and fun dessert cones!
Conclusion:
There you have it – a truly spectacular Banana Pudding Cheesecake Cone recipe that’s guaranteed to impress! This delightful dessert is a magnificent fusion of creamy cheesecake, sweet banana pudding, and the satisfying crunch of a waffle cone. It’s the perfect way to elevate a classic comfort dessert into something elegant and fun. The interplay of textures and flavors is simply divine, making each bite an unforgettable experience. Imagin extracte the smooth, rich cheesecake swirled with velvety banana pudding, all nestled within a crisp, golden cone. It’s a showstopper for any gathering, a perfect treat for a special occasion, or simply a wonderful indulgence for yourself.
For serving suggestions, these cones are best enjoyed immediately after assembly for optimal cone crispness. They are wonderful on their own, but you could also serve them with a dusting of crushed Nilla Wafers or a drizzle of caramel sauce for an extra layer of decadence. Looking for variations? Feel free to experiment with different cookie crum extractbles at the bottom of the cone, perhaps some grabeef ham cracker or even shortbread. For a twist on the banana flavor, consider adding a hint of rum extract extract to the pudding or cheesecake layer. Don’t be afraid to get creative!
I truly encourage you to give this Banana Pudding Cheesecake Cone recipe a try. It’s more accessible than you might think, and the joy you’ll bring to your taste buds and your guests is absolutely worth it. Happy baking!
Frequently Asked Questions:
Q: Can I make the cheesecake filling and banana pudding ahead of time?
Yes, you absolutely can! The cheesecake filling and banana pudding can both be prepared a day in advance and stored separately in airtight containers in the refrigerator. This will save you time on the day you plan to assemble the cones.
Q: How should I store leftover cones?
These cones are best enjoyed fresh as the cone can become soggy over time. If you have any leftovers, it’s best to store the filling separately from the cones in airtight containers in the refrigerator. Assemble just before serving to maintain crispness.
Banana Pudding Cheesecake Cones
A delightful no-bake dessert featuring creamy cheesecake filling layered with banana pudding and crushed cookies inside crunchy waffle cones.
Ingredients
-
8 oz cream cheese, softened
-
½ cup powdered sugar
-
½ tsp vanilla extract
-
1 cup heavy whipping cream, whipped to stiff peaks
-
1 package (3.4 oz) instant banana pudding mix
-
2 cups cold milk
-
8 waffle cones
-
½ cup crushed vanilla wafers
-
Caramel sauce drizzle
-
Extra crushed vanilla wafers
Instructions
-
Step 1
In a medium bowl, beat the softened cream cheese, powdered sugar, and vanilla extract until smooth and creamy. -
Step 2
Gently fold the whipped heavy cream into the cream cheese mixture until well combined. -
Step 3
In a separate bowl, whisk together the instant banana pudding mix and cold milk according to pudding package directions. Let it set for 5 minutes. -
Step 4
Spoon a layer of the cheesecake mixture into the bottom of each waffle cone. -
Step 5
Add a layer of the prepared banana pudding over the cheesecake mixture in each cone. -
Step 6
Sprinkle some crushed vanilla wafers over the pudding layer. -
Step 7
Top with another layer of cheesecake mixture, followed by more banana pudding and crushed vanilla wafers. -
Step 8
Drizzle with caramel sauce and garnish with extra crushed vanilla wafers. Serve immediately or chill before serving.
Important Information
Nutrition Facts (Per Serving)
It is important to consider this information as approximate and not to use it as definitive health advice.
Allergy Information
Please check ingredients for potential allergens and consult a health professional if in doubt.