Lemon Blueberry Truffles – Easy Dessert Recipe
Lemon Blueberry Truffles are a little burst of sunshine and happiness, all rolled into one delightful bite. Have you ever craved a treat that’s both sophisticated and utterly comforting? That’s precisely what these Lemon Blueberry Truffles deliver. They’re the perfect answer for those moments when you need a little pick-me-up, a thoughtful homemade gift, or a dazzling addition to your dessert table. What’s not to adore about the vibrant tang of fresh lemon perfectly balanced with the sweet, bursting juiciness of blueberries? It’s a classic flavor combination that sings. These aren’t just any truffles; they’re a celebration of bright, clean flavors, offering a wonderfully creamy interior nestled within a delicate outer shell. Get ready to fall in love with the simple elegance of these irresistible Lemon Blueberry Truffles – they’re truly special.

Lemon Blueberry Truffles
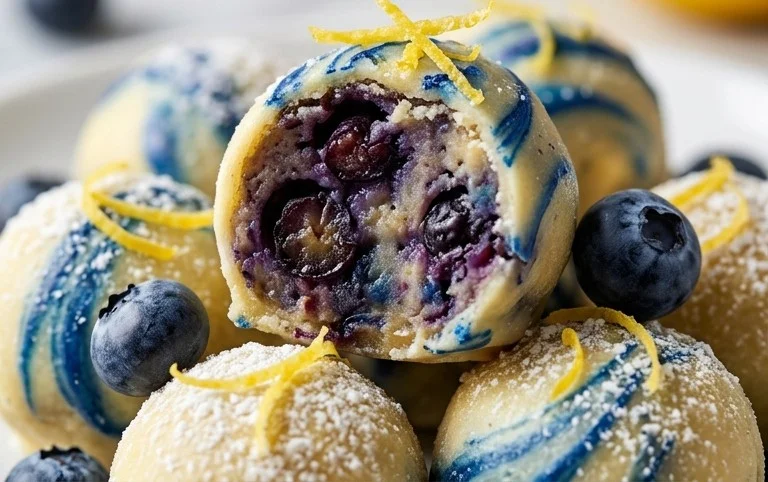
Get ready to indulge in a treat that’s both vibrant and wonderfully satisfying! These Lemon Blueberry Truffles are a delightful burst of sunshine, combining the tartness of fresh lemon with the sweet juiciness of blueberries, all wrapped up in a creamy, decadent truffle. What makes them even better? They’re entirely raw, gluten-free, and packed with wholesome goodness. Forget complicated baking; these little spheres of joy are surprisingly simple to make and perfect for a healthy indulgence, a special occasion, or just because you deserve something delicious.
The magic of these truffles lies in their natural sweetness and rich textures. The base is a delightful medley of dates, walnuts, and wild blueberries, providing a satisfying chew and an explosion of fruity flavor. The addition of gluten-free rolled oats adds a subtle body, while shredded coconut and chia seeds contribute a lovely texture and nutritional boost. And of course, the zesty kick of fresh lemon ties it all together, preventing it from being overly sweet and adding that essential bright note.
The creamy frosting is where the decadence truly shines. Soaked cashews blend into an unbelievably smooth and rich base, enhanced by the subtle sweetness of raw honey, the warmth of vanilla, and another generous squeeze of lemon juice. The melted coconut oil helps to bind everything together and creates that signature truffle texture when chilled. These aren’t just any truffles; they’re a testament to how incredible healthy, unprocessed ingredients can taste.
Ingredients:
Making the Truffle Base
Let’s get started with the heart of our truffles. The first step involves processing the ingredients for the raw cake base. Grab your food processor. Add the walnuts and pulse them a few times until they are roughly chopped, not completely pulverized. We want a bit of texture in our truffles. Next, add the pitted dates. These will act as our natural binder and sweetener, so process everything together until the dates start to break down and form a sticky paste. It’s important not to over-process at this stage, as we still want some distinct pieces of walnut.
Now, it’s time to incorporate the remaining dry ingredients for the base. Add the gluten-free rolled oats, shredded coconut, and chia seeds to the food processor. Give it another few pulses. You’re looking for a consistency where the mixture starts to clump together when you press it with your fingers. If it seems a bit dry, you can add a teaspoon of water at a time, but be cautious not to make it too wet. Finally, add the wild blueberries and the juice of one lemon. Pulse gently, just enough to incorporate the blueberries and lemon juice. We want the blueberries to remain somewhat intact to provide those bursts of flavor and color throughout the truffle. This mixture should now be firm enough to roll into balls.
Forming the Truffles
Once your truffle base is ready, it’s time to roll them. Take small portions of the mixture and roll them between your palms to form uniform balls, about 1-inch in diameter. If the mixture is sticking to your hands, you can lightly dampen your hands with a little water. This part is quite therapeutic! As you roll, you’ll notice the beautiful speckles of blueberry throughout the dough. Aim for consistency in size so that your truffles bake (or rather, set) evenly. You should end up with approximately 15-20 truffles, depending on the size you make them. Place these rolled truffles onto a baking sheet lined with parchment paper.
Crafting the Creamy Frosting
While the truffle base is setting, let’s prepare the luscious frosting. Drain your soaked cashews thoroughly. Add the drained cashews to a high-speed blender. Pour in the melted and slightly cooled coconut oil. Add the raw honey, vanilla extract, and the juice of the second lemon. Begin extract blending. You’ll likely need to scrape down the sides of the blender a few times. Start with 2 tablespoons of warm water. Blend until the mixture is completely smooth and creamy. If it’s still too thick to blend properly, add the remaining tablespoon of warm water, or a tiny bit more if needed, until you achieve a thick but pourable consistency, much like a rich frosting or ganache. Taste the frosting and adjust the sweetness or lemon flavor if you desire.
Assembling and Chilling the Truffles
Now for the final, delightful step: coating the truffles. Take your rolled truffle balls from the refrigerator. Carefully dip each truffle into the creamy cashew frosting, ensuring it’s fully coated. You can use a fork or a toothpick to gently lift the truffle and allow any excess frosting to drip back into the bowl. Place the coated truffles back onto the parchment-lined baking sheet. It’s essential to work relatively quickly here, as the frosting will start to firm up as it’s exposed to the cooler air.
Once all the truffles are coated, it’s time for them to set and firm up properly. Carefully transfer the baking sheet to the freezer for about 15-20 minutes, or until the frosting is firm to the touch. This chilling process is crucial for achieving that perfect truffle texture. Once they are firm, you can optionally garnish them. Some shredded coconut, a sprinkle of finely chopped walnuts, or a few dried blueberry pieces can add a beautiful finishing touch. For longer storage, keep these Lemon Blueberry Truffles in an airtight container in the refrigerator. They are best enjoyed within a week, but I doubt they’ll last that long! Enjoy this guilt-free indulgence!
Conclusion:
There you have it – the ultimate guide to creating delightful Lemon Blueberry Truffles! This recipe truly shines with its perfect balance of zesty lemon and sweet, bursting blueberries, all enveloped in a rich, creamy truffle. They are remarkably easy to make, making them an ideal treat for both novice bakers and experienced confectioners alike. Whether you’re looking for an elegant dessert to impress guests, a special homemade gift, or simply a satisfying sweet indulgence, these truffles are a guaranteed hit. The vibrant flavors and beautiful appearance make them stand out.
I highly encourage you to give these Lemon Blueberry Truffles a try! You’ll be amazed at how simple it is to create such a gourmet-tasting treat in your own kitchen. Don’t be afraid to experiment with the suggestions below to make them your own.
Frequently Asked Questions:
Can I make these Lemon Blueberry Truffles ahead of time?
Absolutely! These truffles store exceptionally well. Once they’ve set, you can keep them in an airtight container in the refrigerator for up to a week. This makes them perfect for preparing in advance for parties or holidays. Just let them sit at room temperature for about 10-15 minutes before serving for the best texture.
What are some good variations for these truffles?
The possibilities are endless! For a touch of crunch, consider rolling some of your finished truffles in finely chopped pistachios or toasted slivered almonds. You could also add a hint of lavender to the truffle mixture for a floral note, or swirl in a touch of white chocolate ganache before chilling for a marbled effect. For a more intense blueberry flavor, try using blueberry powder in addition to fresh berries.
How should I best serve these Lemon Blueberry Truffles?
These truffles are fantastic served on their own as a decadent dessert. They also make a beautiful addition to a dessert platter or a cheese board. For an extra special touch, serve them alongside a scoop of vanilla bean ice cream or with a light dusting of powdered sugar. They are also wonderfully paired with a cup of tea or coffee.
Lemon Blueberry Truffles
Delightful no-bake vegan truffles bursting with lemon and blueberry flavor, made with wholesome ingredients.
Ingredients
-
1 cup wild blueberries
-
1 cup walnuts
-
1 cup dates
-
3 tbsp gluten-free rolled oats
-
2 tbsp shredded coconut
-
1 tbsp chia seeds
-
1 lemon, juiced
-
1 cup cashews (soaked)
-
½ cup coconut oil, melted and cooled
-
3 tbsp raw honey
-
1 tsp vanilla extract
-
2-3 tbsp warm water
Instructions
-
Step 1
For the truffle base: Combine wild blueberries, walnuts, dates, gluten-free rolled oats, shredded coconut, and chia seeds in a food processor. Pulse until a sticky dough forms. -
Step 2
Add the juice of 1 lemon to the truffle base mixture. Process again until well combined. -
Step 3
Roll the truffle base mixture into small balls, about 1 inch in diameter. Place on a parchment-lined baking sheet and freeze for at least 30 minutes. -
Step 4
For the frosting: Drain the soaked cashews. Combine drained cashews, melted and cooled coconut oil, raw honey, vanilla extract, and the juice of 1 lemon in a high-speed blender. -
Step 5
Blend the frosting ingredients until completely smooth and creamy, adding 2-3 tablespoons of warm water as needed to achieve desired consistency. -
Step 6
Dip each frozen truffle into the frosting, ensuring it’s fully coated. Return to the parchment-lined baking sheet. -
Step 7
Refrigerate the coated truffles for at least 1 hour, or until the frosting is set.
Important Information
Nutrition Facts (Per Serving)
It is important to consider this information as approximate and not to use it as definitive health advice.
Allergy Information
Please check ingredients for potential allergens and consult a health professional if in doubt.