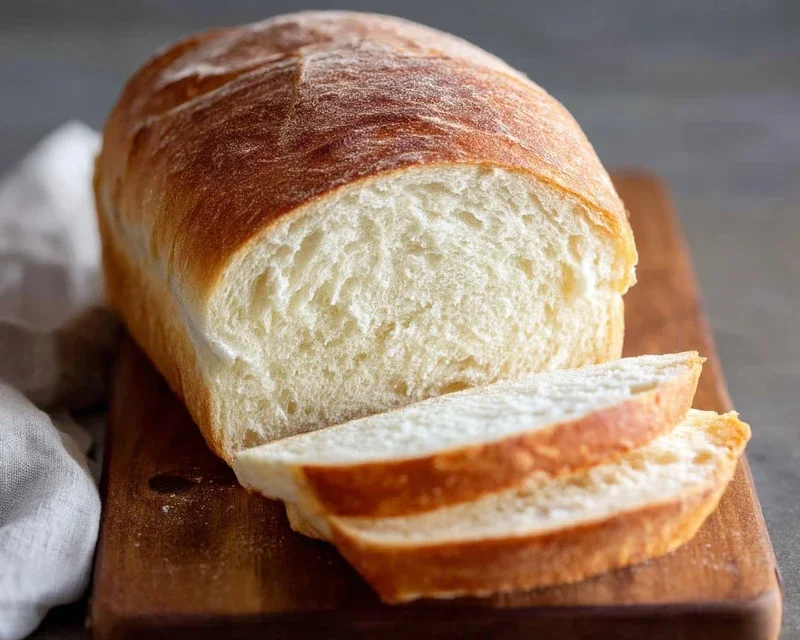
Easy Homemade Bread Recipe – Delicious & Simple Baking
Homemade bread is more than just a food; it’s an experience. There’s something profoundly satisfying about transforming simple ingredients – flour, water, yeast, and salt – into a warm, fragrant loaf. We love homemade bread because it connects us to tradition, to the very essence of sustenance. Forget the bland, mass-produced versions from the grocery store. This is bread with soul. The crackle of the crust as you slice into it, the pillowy softness of the interior, the inimitable aroma that fills your kitchen – these are the hallmarks of truly exceptional homemade bread. It’s a labor of love, yes, but the rewards are immense. Whether you’re a complete novice or have dabbled in baking before, mastering the art of homemade bread will bring a smile to your face and deliciousness to your table. Let’s embark on this delicious journey together and create a masterpiece of homemade bread that will have everyone asking for seconds.

The Joy of Homemade Bread: A Simple Recipe for Begin extractners
There’s a unique satisfaction that comes from pulling a perfectly golden, fragrant loaf of bread from your own oven. The aroma alone is enough to make your kitchen feel like the warmest, most inviting place on earth. While the idea of baking bread from scratch might seem daunting, I promise you, it’s simpler than you think, especially with this straightforward recipe. This is a recipe I’ve honed over time, perfect for begin extractners and seasoned bakers alike, yielding a wonderfully soft interior with a satisfyingly crisp crust. Let’s get started on this delicious journey!
Ingredients:
*Note on Flour and Yeast: For the best results in terms of chegrape juicess and rise, I highly recommend using bread flour. It has a higher protein content which develops gluten more effectively, leading to a better texture. If you can’t find bread flour, all-purpose flour will work, but the texture might be slightly softer. As for yeast, ensure it’s active dry yeast and not instant yeast, as they require slightly different handling. Check the expiration date on your yeast; old yeast won’t produce a good rise.
Getting Started: Activating the Yeast
The first step in our bread-making adventure is to awaken the yeast. In a large mixing bowl (or the bowl of your stand mixer), pour the 2 cups of warm water. The temperature is crucial here – too hot and you’ll kill the yeast, too cool and it won’t activate properly. Think of it as comfortably warm to the touch, like a baby’s bathwater. Sprinkle the active dry yeast over the water and then add your chosen sweetener – either the 1/4 cup of honey or sugar. Give it a gentle stir. Now, the magic begin extracts! Let this mixture sit undisturbed for about 5-10 minutes. You’ll know the yeast is alive and ready to work when it becomes foamy and bubbly on the surface, almost like a miniature lava lamp. If you don’t see any bubbling, your yeast might be old or the water was the wrong temperature, and you’ll need to start over with fresh yeast.
Mixing the Dough
Once your yeast is happily frothing, it’s time to add the other wet ingredients. Pour in the 2 tablespoons of oil and the 2 teaspoons of salt. Give everything a good stir to combine. Now, we’ll start adding the flour. Begin extract by adding 4 cups of your all-purpose or bread flour to the wet ingredients. If you’re using a stand mixer, attach the dough hook and mix on low speed until the ingredients just start to come together. If you’re mixing by hand, stir with a sturdy spoon or spatula until the flour is mostly incorporated.
The dough will likely be quite shaggy and sticky at this point. This is perfectly normal. Now, we need to start adding more flour, gradually, until the dough begin extracts to pull away from the sides of the bowl. This is where the 4-5 1/2 cup range for flour comes in. You might need less, or you might need more, depending on the humidity in your kitchen and the specific type of flour you’re using. Add about 1/4 cup of flour at a time, mixing after each addition, until the dough starts to form a cohesive ball. The dough should still be a little sticky to the touch, but it shouldn’t cling excessively to your fingers or the sides of the bowl. Over-flouring will result in a dense, dry loaf, so resist the urge to add too much!
Kneading the Dough: Developing the Gluten
Kneading is perhaps the most important step in developing the structure of your bread. It’s the process that develops the gluten, which gives the bread its elasticity and chewy texture.
If you’re using a stand mixer, continue kneading with the dough hook on medium-low speed for about 6-8 minutes. The dough should become smooth, elastic, and a little shiny. It will start to “clean” the sides of the bowl more effectively.
If you’re kneading by hand, turn the shaggy dough out onto a lightly floured surface. Push the dough away from you with the heels of your hands, then fold it back over itself. Rotate the dough a quarter turn and repeat. This technique, known as the stretch and fold method, is incredibly effective. Continue kneading for about 10-15 minutes. The dough will transform from sticky and rough to smooth, elastic, and soft. You can test if your dough is ready by performing the “windowpane test”: gently stretch a small piece of dough. If you can stretch it thin enough to see light through it without it tearing, your gluten is well-developed.
The First Rise: Patience is a Virtue
Once your dough is beautifully kneaded, it’s time for its first nap. Lightly grease a clean large bowl with a little oil. Place the kneaded dough into the greased bowl and turn it to coat all sides with oil. This prevents a dry skin from forming on the dough. Cover the bowl tightly with plastic wrap or a clean kitchen towel. Find a warm, draft-free spot in your kitchen for the dough to rise. This could be on top of your refrigerator, near a gently warmed oven (make sure it’s off!), or just on the counter if your kitchen is naturally warm.
Let the dough rise for about 1 to 1.5 hours, or until it has doubled in size. This process is called proofing, and it’s where the yeast works its magic, producing carbon dioxide gas that makes the dough puff up. The time it takes can vary depending on the ambient temperature, so focus on the dough doubling in size rather than the clock.
Shaping and Second Rise
Once your dough has doubled, gently punch it down to release the trapped gases. Turn the dough out onto a lightly floured surface again. Now, you can shape your loaf. For a classic round loaf, gently tuck the edges under to form a taut ball. For a sandwich loaf, shape it into an oblong rectangle and then roll it up tightly, sealing the seam. Place your shaped loaf into a greased loaf pan or onto a parchment-lined baking sheet.
Cover the loaf loosely with a clean kitchen towel or plastic wrap. Let it rise again in a warm place for another 30-45 minutes, or until it has nearly doubled in size. This second rise is crucial for achieving a light and airy texture. You can also gently poke the dough with your finger; if the indentation slowly springs back, it’s ready.
Baking to Perfection
Preheat your oven to 375 degrees Fahrenheit (190 degrees Celsius) during the second rise. Once the oven is preheated and the dough has completed its second rise, it’s time to bake! Carefully place the loaf into the preheated oven.
Bake for 30-40 minutes, or until the crust is a deep golden brown and the internal temperature reaches 190-200 degrees Fahrenheit (88-93 degrees Celsius) when measured with an instant-read thermometer. If the crust starts to brown too quickly, you can loosely tent it with aluminum foil. When the bread is done, it should sound hollow when tapped on the bottom.
Remove the bread from the oven and immediately transfer it from the baking pan to a wire rack. This is important to prevent the bottom crust from becoming soggy. Let the bread cool completely on the wire rack before slicing. I know it’s tempting to cut into it straight away, but resist! Cooling allows the internal structure to set, resulting in a better texture and flavor.
Enjoy the fruits of your labor – a delicious, homemade loaf of bread that’s perfect for sandwiches, toast, or just enjoying with a smear of butter. Happy baking!
Conclusion:
Congratulations on embarking on the wonderful journey of making your own
homemade bread
! We hope this recipe has demystified the process and inspired you to create delicious, artisanal loaves right in your own kitchen. The beauty of this recipe lies in its simplicity, allowing the natural flavors of the ingredients to shine through, resulting in a wonderfully aromatic and satisfying crusty exterior with a soft, chewy interior. There’s an unparalleled sense of accomplishment and pure joy that comes from pulling a warm loaf out of the oven, knowing you made it from scratch.
This versatile loaf is perfect for any meal. Imagin extracte it toasted with butter and jam for breakfast, as the foundation for hearty sandwiches, or alongside your favorite soup or stew for dinner. Don’t be afraid to get creative with variations! You can easily incorporate herbs like rosemary or thyme, add seeds for extra texture and flavor, or even swirl in some cheese or olives. The possibilities are truly endless!
We wholeheartedly encourage you to give this
homemade bread
recipe a try. It’s an accessible and rewarding endeavor that will elevate your everyday meals and impress your friends and family. Embrace the process, savor the aroma, and most importantly, enjoy the incredibly delicious results!
Frequently Asked Questions:
Why is my bread dense instead of fluffy?
A dense loaf often indicates under-proofing (not letting the dough rise enough) or insufficient gluten development. Ensure you’re allowing the dough to double in size during its rise, and don’t skip the kneading step to develop that essential gluten structure.
Can I use a different type of flour?
Yes, you can experiment! However, most recipes are designed for all-purpose or bread flour for optimal gluten. If you switch to whole wheat, you might need slightly more liquid, and the texture will be denser. Start with the recommended flour and then explore from there.
How should I store my homemade bread?
Once completely cooled, store your
homemade bread
in a bread box, a paper bag, or a loosely covered container at room temperature for 2-3 days. For longer storage, it freezes beautifully. Wrap it tightly in plastic wrap followed by foil, and it will keep for up to 3 months.
Homemade Bread
A simple and delicious recipe for classic homemade bread, perfect for sandwiches or toasting.
Ingredients
-
2 cups warm water (105-115 degrees Fahrenheit)
-
1 Tablespoon active dry yeast
-
1/4 cup honey
-
2 teaspoons salt
-
2 Tablespoons canola oil
-
4 – 5 1/2 cups all-purpose flour
Instructions
-
Step 1
In a large bowl, combine the warm water, honey, and yeast. Stir gently and let sit for 5-10 minutes until foamy. -
Step 2
Stir in the salt and canola oil. -
Step 3
Gradually add the flour, 1 cup at a time, mixing until a shaggy dough forms. Turn the dough out onto a lightly floured surface. -
Step 4
Knead the dough for 8-10 minutes, until it is smooth and elastic. Add more flour if needed, but avoid making the dough too stiff. -
Step 5
Place the dough in a lightly oiled bowl, turning to coat. Cover with a damp cloth and let rise in a warm place for 1-1.5 hours, or until doubled in size. -
Step 6
Punch down the dough and shape it into a loaf. Place in a greased loaf pan. -
Step 7
Bake at 375 degrees Fahrenheit (190 degrees Celsius) for 30-35 minutes, or until the crust is golden brown and the internal temperature reaches 200 degrees Fahrenheit (93 degrees Celsius). -
Step 8
Remove from the pan and let cool completely on a wire rack before slicing.
Important Information
Nutrition Facts (Per Serving)
It is important to consider this information as approximate and not to use it as definitive health advice.
Allergy Information
Please check ingredients for potential allergens and consult a health professional if in doubt.