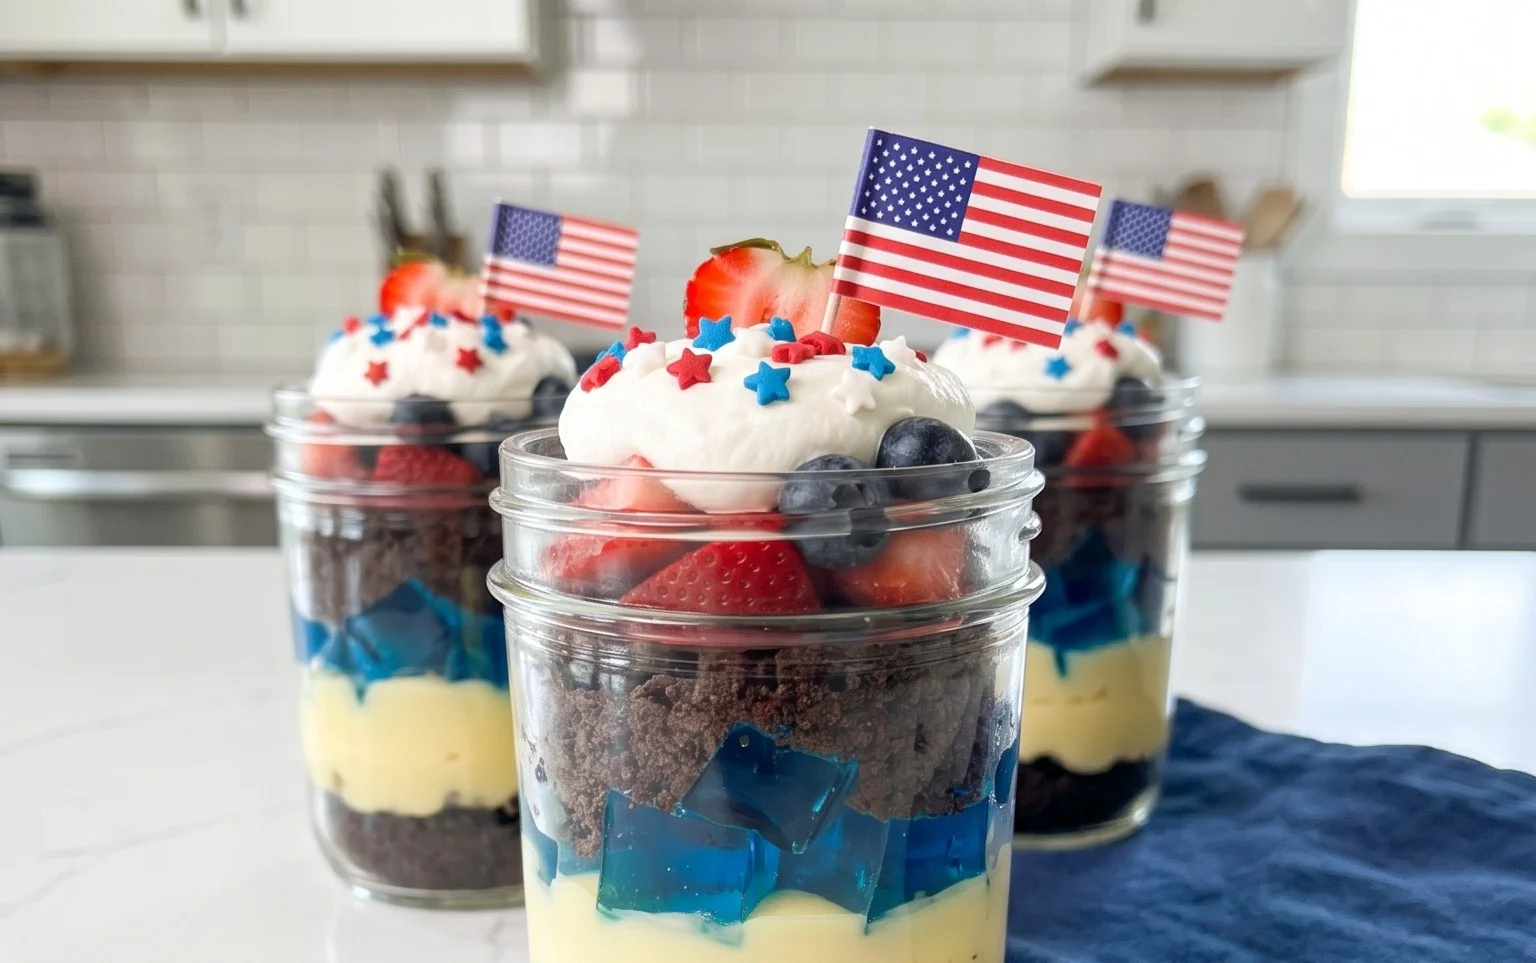
Red White Blue Dirt Cups- Easy Patriotic Treat
Red, White and Blue Dirt Cups are the ultimate nostalgic treat, and I’m so excited to share this recipe with you! These delightful layered desserts are a guaranteed crowd-pleaser, perfect for any summer celebration, Fourth of July bash, or even just a fun afternoon project with the kids. What makes Red, White and Blue Dirt Cups so universally loved? It’s the playful presentation, of course! They mimic a mini garden, complete with “dirt” made from crushed chocolate cookies and a sweet, creamy pudding base. But the real magic comes with the vibrant red and blue fruit layers, reminiscent of patriotic colors, nestled between that delicious chocolatey soil. They’re incredibly simple to assemble, making them an accessible recipe for bakers of all skill levels. Get ready to dig into this fun and festive dessert!
Red, White and Blue Dirt Cups
Get ready to celebrate with these incredibly fun and delicious Red, White and Blue Dirt Cups! Perfect for patriotic holidays like the Fourth of July or Memorial Day, or any time you want a festive treat, these cups are a guaranteed crowd-pleaser. They’re so easy to make that even the youngest bakers can help, and the vibrant colors and playful presentation will bring smiles all around. We’re taking the classic dirt cup concept and giving it a patriotic twist that’s as delightful to look at as it is to eat. Each spoonful is a delightful mix of creamy pudding, crunchy cookie crum extractbs, and a pop of gummy worm goodness. Let’s dive in and create some edible magic!
Ingredients:
Preparing the Pudding Base
The foundation of our dirt cups is a rich and creamy pudding. We’re starting with cheesecake flavored pudding for an extra decadent taste that pairs beautifully with the chocolate cookie “dirt.”
1. In a large bowl, whisk together the contents of both cheesecake pudding boxes. Make sure to get out any lumps. Gradually pour in the 4 cups of milk while continuously whisking. It’s important to whisk vigorously for about 2 minutes, or until the pudding mixture begin extracts to thicken. This step is crucial for ensuring a smooth and silky pudding texture that sets up perfectly. Once you’ve achieved a good consistency, cover the bowl with plastic wrap, pressing the wrap directly onto the surface of the pudding. This prevents a skin from forming. Refrigerate for at least 1 hour, or until the pudding is thoroughly chilled and firm. While the pudding is chilling, we can get our “dirt” ready!
Creating the “Dirt”
No dirt cup is complete without its signature chocolate cookie “dirt”! We’ll be using classic Oreo cookies for this, as their rich chocolate flavor and dark color are perfect.
2. Take your 19 Oreo cookies and place them into a resealable plastic bag. Seal the bag tightly, making sure to remove as much air as possible. Then, using a rolling pin, a meat mallet, or even the bottom of a sturdy glass, crush the cookies into fine crum extractbs. You want a texture that resembles soil – not too powdery, but also no large chunks remaining. You can also pulse them a few times in a food processor if you prefer. Set aside your crushed Oreo crum extractbs. These will be layered throughout our cups to mimic the look of rich, dark earth.
Dividing and Coloring the Pudding
Now for the fun part – adding our patriotic colors! We’ll divide the pudding and tint it red and blue to create those festive layers.
3. Once your pudding has chilled and thickened to a firm consistency, it’s time to divide it. Take about half of the chilled pudding and place it into a separate medium-sized bowl. This will be our white layer. To the remaining pudding in the origin extractal large bowl, we will add our red and blue colors. For the red layer, take about half of the remaining pudding and place it into another bowl. Add ¼ teaspoon of red gel food dye to this portion. Gel food dye is recommended as it provides a more vibrant color without thinning the pudding too much. Stir gently but thoroughly until the color is evenly distributed. You’re aiming for a bright, cherry-red hue. For the blue layer, take the remaining pudding and place it into a third bowl. Add ¼ teaspoon of blue gel food dye to this portion and stir until you achieve a vibrant blue color, similar to the red. You should now have three separate bowls of pudding: one plain white, one red, and one blue.
Assembling the Red, White and Blue Dirt Cups
It’s time to bring it all together! We’ll layer our colorful puddings and cookie crum extractbs to create a visually stunning dessert.
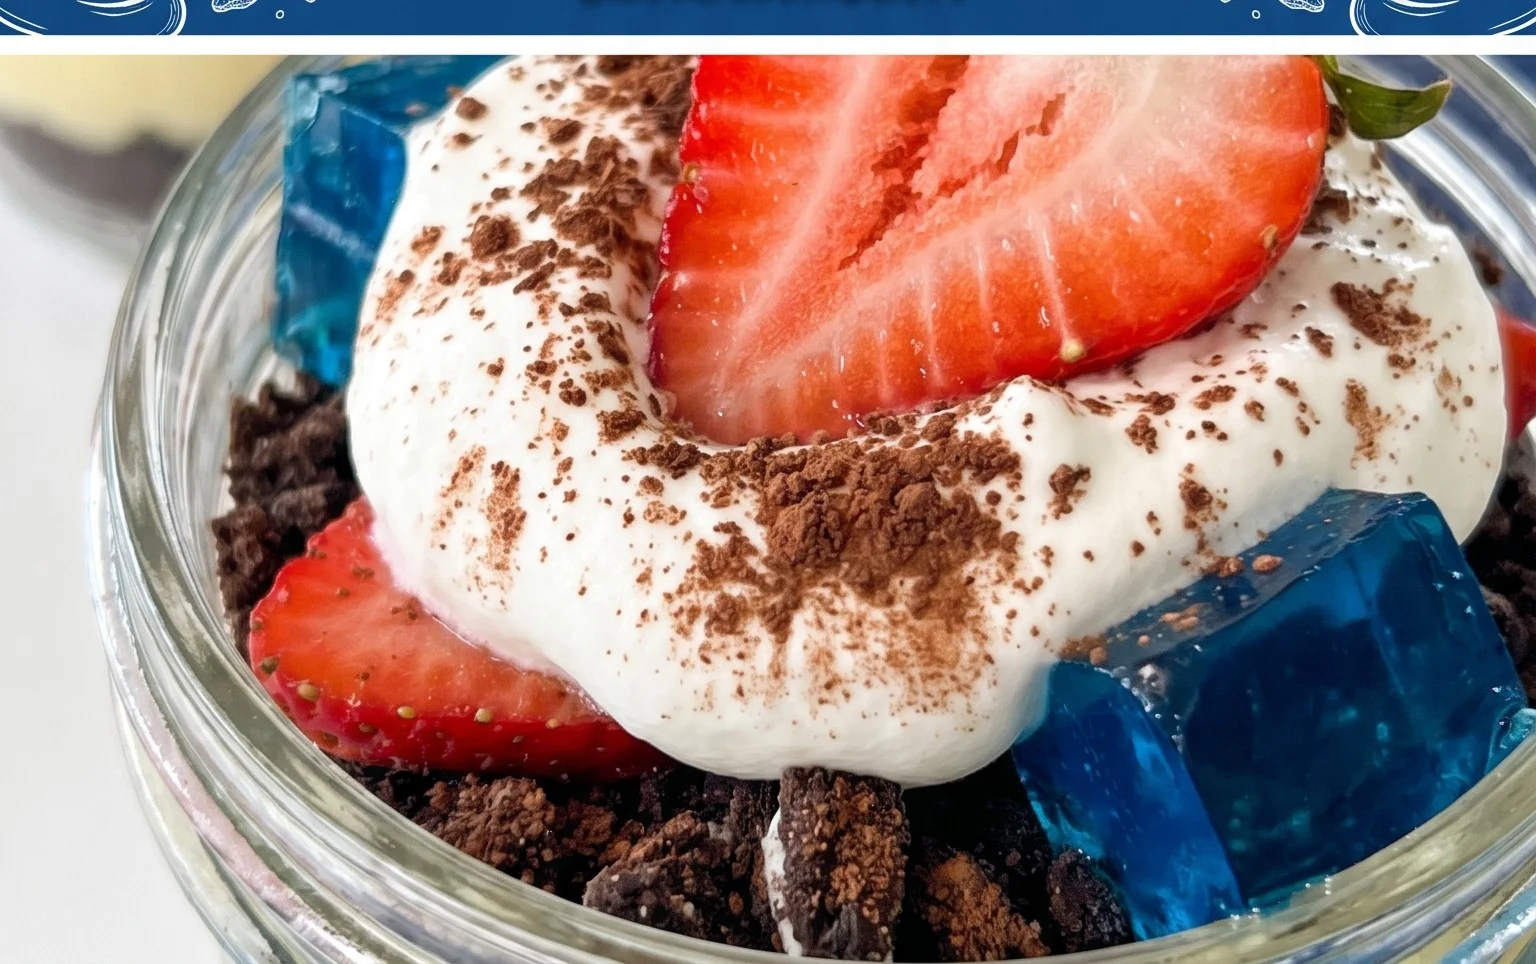
4. Grab your serving cups. These can be clear plastic cups, small glasses, or even mason jars. Begin extract by adding a layer of your crushed Oreo “dirt” to the bottom of each cup, about 1-2 tablespoons per cup. This forms the base of our dirt cup. Next, carefully spoon a layer of the white cheesecake pudding over the cookie crum extractbs. Don’t worry if it’s not perfectly even; a slightly rustic look adds to the charm. After the white layer, add a layer of the red pudding, followed by another layer of crushed Oreo crum extractbs. Continue layering in this fashion, alternating between the blue pudding and more cookie crum extractbs until your cups are nearly full, leaving a little space at the top for garnish. Be mindful of which color you are layering on top of the other to create distinct bands of color. For a more dramatic effect, you can use a piping bag to layer the puddings, but spoons work just fine!
The Finishing Touches
The final steps are all about adding those playful details that make these dirt cups truly special.
5. Once your cups are assembled with layers of pudding and cookie crum extractbs, it’s time for the fun garnishes. On top of the final layer of cookie crum extractbs, add a few more sprinkles of “dirt” to really emphasize the theme. Then, carefully insert one or two red and blue gummy worms into the top layer of “dirt” in each cup, letting them peek out as if they are crawling out of the ground. You can arrange them playfully, perhaps with one half in the dirt and the other half sticking straight up. This is where you can get creative! If you have any extra Oreo crum extractbs, you can sprinkle them around the base of the gummy worms for an extra touch of realism. For an even more festive look, you can add a small American flag pick into each cup. Chill the assembled dirt cups for at least another 30 minutes before serving to allow the flavors to meld and the pudding to set up even further. These Red, White and Blue Dirt Cups are a delightful way to enjoy a patriotic celebration and are sure to be a hit with everyone who tries them! Enjoy!
Conclusion:
I hope you’ve had as much fun exploring the delightful simplicity of these Red, White and Blue Dirt Cups as I have! This recipe is truly a winner because it’s incredibly easy to make, requiring no baking and minimal effort, making it perfect for kids of all ages to particnon-alcoholic ipate in. The combination of creamy pudding, crunchy cookie crum extractbs, and sweet gummy worms creates a playful and delicious treat that’s visually stunning, celebrating the spirit of the season. These are fantastic for summer BBQs, patriotic parties, or any occasion where you want a fun, festive dessert that’s guaranteed to bring smiles.
For serving, these dirt cups are best enjoyed chilled. You can prepare them a few hours in advance, allowing the flavors to meld together beautifully. Consider topping them with a small flag or a sprinkle of edible glitter for an extra special touch. If you’re looking to switch things up, try different flavors of pudding like cheesecake or white chocolate. You could also experiment with different cookies for the “dirt,” such as Oreos or chocolate grabeef ham crackers, or even add a layer of whipped cream between the pudding and cookie crum extractbs. I truly encourage you to give this Red, White and Blue Dirt Cup recipe a try – it’s a guaranteed crowd-pleaser!
Frequently Asked Questions:
Can I make these dirt cups ahead of time?
Absolutely! These are perfect for making ahead. You can prepare them up to 24 hours in advance. Just make sure to cover them tightly with plastic wrap to prevent the pudding from forming a skin and the cookie crum extractbs from getting too soggy. They’re often even better the next day!
What are some other topping ideas besides gummy worms?
The possibilities are endless! You could use candy rocks, chocolate chips, mini marshmallows, fresh berries (strawberries and blueberries would be perfect!), or even edible flowers for a more sophisticated look. Small pretzel sticks could also add a fun texture and shape.
Can I use a different type of pudding?
Yes, you can! While chocolate pudding is traditional for the “dirt” effect, feel free to get creative. Vanilla, white chocolate, or even cheesecake flavored pudding would work well, though they might not give you the classic dirt cup appearance unless you top them with darker cookie crum extractbs. You could also try making your own homemade chocolate pudding for an extra special touch.
Red, White and Blue Dirt Cups
A festive and fun dessert featuring layers of creamy cheesecake pudding, crushed Oreo cookies, and colorful gummy worms.
Ingredients
-
2 boxes cheesecake pudding (3.4 ounces each)
-
4 cups milk
-
19 Oreo cookies (crushed)
-
¼ teaspoon red gel food dye
-
¼ teaspoon blue gel food dye
-
8 red and blue gummy worms
Instructions
-
Step 1
In a large bowl, whisk together the cheesecake pudding mixes and milk until well combined and slightly thickened. -
Step 2
Divide the pudding mixture into three separate bowls. -
Step 3
In the first bowl, stir in the red gel food dye until evenly distributed. In the second bowl, stir in the blue gel food dye until evenly distributed. Leave the third bowl plain for the white layer. -
Step 4
In the bottom of 8 small cups or jars, place a layer of crushed Oreo cookies. -
Step 5
Spoon a layer of the plain cheesecake pudding over the cookie crumbs. -
Step 6
Add another layer of crushed Oreo cookies. -
Step 7
Top with a layer of red cheesecake pudding, followed by another layer of crushed Oreos. -
Step 8
Finish with a layer of blue cheesecake pudding. -
Step 9
Decorate each cup with a red and blue gummy worm, pushing them into the pudding to resemble worms coming out of the dirt. -
Step 10
Chill for at least 15 minutes before serving.
Important Information
Nutrition Facts (Per Serving)
It is important to consider this information as approximate and not to use it as definitive health advice.
Allergy Information
Please check ingredients for potential allergens and consult a health professional if in doubt.