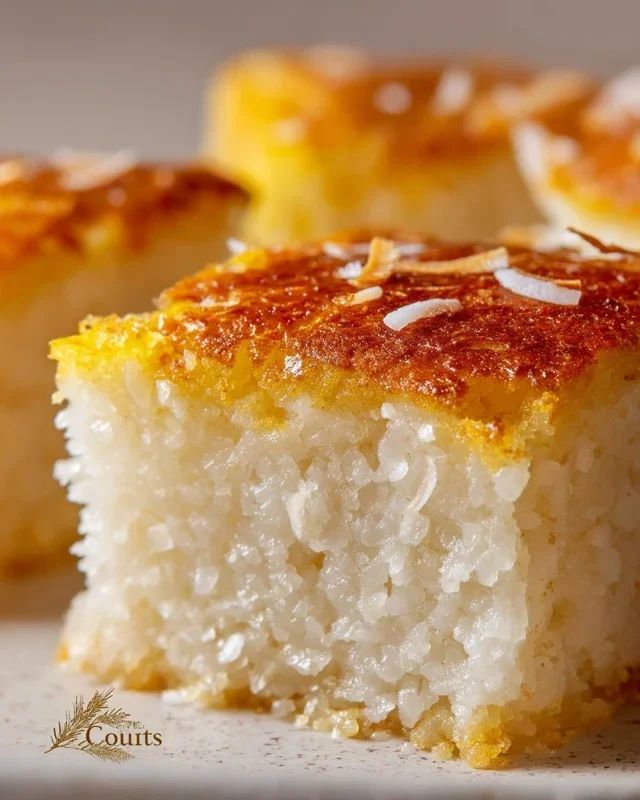
Sticky Coconut Cake Recipe – Easy Tropical Treat
Sticky Coconut Cake is more than just a dessert; it’s a tropical escape on a plate. There’s something utterly irresistible about the combination of tender, moist cake infused with the sweet, nutty aroma of coconut, all drizzled with a luscious, gooey caramel that lives up to its “sticky” moniker. It’s the kind of cake that transports you straight to a sun-drenched beach with every bite. Why do we love it so much? Perhaps it’s the comforting sweetness, the delightful chew from shredded coconut, or the decadent glaze that promises pure indulgence. What truly makes this Sticky Coconut Cake special is its ability to be both incredibly comforting and wonderfully exotic, a delightful paradox that keeps us coming back for more. Get ready to create a masterpiece that will have everyone asking for the recipe!
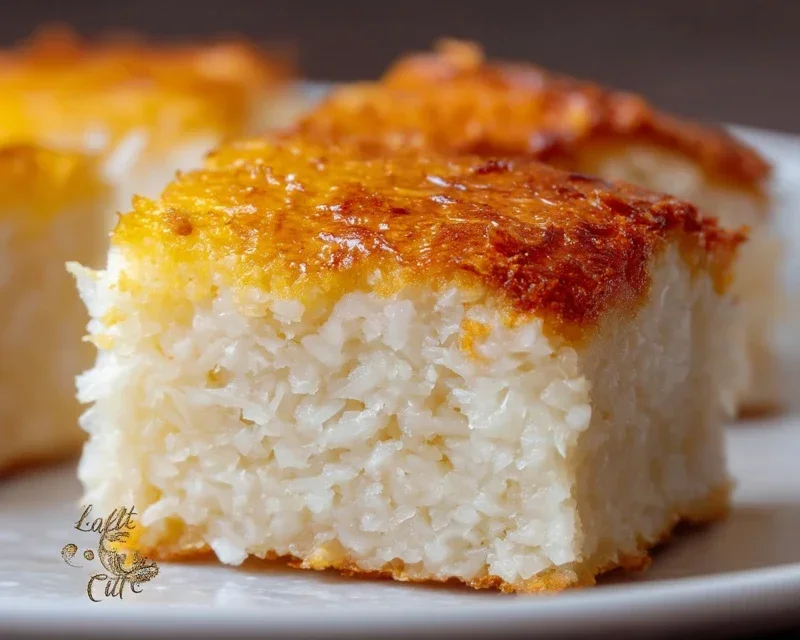
Sticky Coconut Cake
There are some desserts that just feel like a warm hug, and this Sticky Coconut Cake is definitely one of them. It’s wonderfully moist, packed with rich coconut flavor, and has a delightful chewy texture that makes it utterly irresistible. This cake is surprisingly simple to make, relying on a few key ingredients to create its magic. The beauty of this recipe lies in its simplicity and the way the glutinous rice flour creates that characteristic sticky, chewy goodness that’s so satisfying. It’s perfect for an afternoon treat with a cup of tea, a comforting dessert after a meal, or even as a special occasion bake.
I love how the full-fat coconut milk infuses every bite with creamy tropical flavor, and the shredded coconut adds both texture and an intensified coconut aroma. This isn’t a light and airy cake; it’s dense, rich, and utterly decadent in the best possible way. Don’t be intimidated by the glutinous rice flour; it’s the secret to the cake’s unique texture and is readily available in most Asian grocery stores or the international aisle of larger supermarkets.
Ingredients:
Cooking Instructions:
Let’s get started on creating this delightful cake. The process is straightforward, focusing on combining the wet and dry ingredients to create a luscious batter.
Preparation is Key
Before we dive into mixing, it’s always a good idea to preheat your oven to 350°F (175°C) and prepare your baking pan. I like to use an 8×8 inch square baking pan, or a similarly sized round pan. Greasing and flouring your pan is crucial to prevent sticking, especially with a cake that has a tendency to be… well, sticky! You can use butter or cooking spray for greasing, and then dust it with a little flour, tapping out any excess. Alternatively, you can line the bottom of your pan with parchment paper for extra insurance. Ensure you have all your ingredients measured out and ready to go. This makes the mixing process much smoother and more enjoyable.
Mixing the Wet Ingredients
In a large bowl, we’ll start by creaming together the egg yolks and granulated sugar. I like to use an electric mixer for this, starting on a low speed and gradually increasing to medium-high. You’re looking for the mixture to become pnon-alcoholic ale yellow and visibly fluffy. This process incorporates air into the batter, which helps with the cake’s texture. Next, we’ll gently whisk in the full-fat canned coconut milk and the vanilla extract. Make sure to whisk until everything is well combined and you have a smooth, creamy liquid. The scent of vanilla with the creamy coconut milk is already a promising sign!
Combining Dry Ingredients and Adding Coconut
In a separate medium bowl, whisk together the glutinous rice flour and 2 cups of the shredded sweetened coconut. It’s important to have these dry ingredients well mixed before adding them to the wet ingredients. This ensures that the flour is evenly distributed and prevents clumps. Now, we’ll gradually add the dry ingredients to the wet ingredients, mixing on low speed until just combined. Be careful not to overmix at this stage; overmixing can lead to a tougher cake. Once the flour mixture is incorporated, gently fold in the remaining 1 cup of shredded sweetened coconut. This remaining coconut will remain more distinct in the cake, adding delightful pockets of chewy sweetness.
Whipping the Egg Whites
This step is essential for adding a touch of lightness to our dense cake. In a clean, dry bowl (any trace of grease will prevent the egg whites from whipping properly), beat the egg whites on medium-high speed until stiff peaks form. Stiff peaks mean that when you lift the whisk, the egg whites stand up straight and hold their shape. This process can take a few minutes, so be patient. Once you have your stiff peaks, gently fold about a third of the whipped egg whites into the cake batter. This lightens the batter slightly, making it easier to incorporate the rest. Then, gently fold in the remaining egg whites until no streaks of white remain. Again, the key here is to fold, not to stir vigorously, to preserve the airiness of the egg whites.
Baking Your Sticky Coconut Cake
Pour the batter into your prepared baking pan and spread it evenly. The batter will be quite thick. Place the pan in your preheated oven and bake for approximately 40-50 minutes, or until a wooden skewer or toothpick inserted into the center of the cake comes out clean. The top of the cake should be golden brown and firm to the touch. As the cake bakes, you’ll notice a wonderfully sweet and tropical aroma filling your kitchen. It’s a testament to the simple, delicious ingredients working their magic.
Cooling and Enjoying
Once baked, remove the cake from the oven and let it cool in the pan on a wire rack for about 15-20 minutes. This allows the cake to set further. After this initial cooling period, you can carefully invert the cake onto the wire rack to cool completely. Resist the urge to slice into it immediately; allowing it to cool fully will result in a much better texture and easier slicing. This sticky coconut cake is delicious served on its own, but you can also enjoy it with a dollop of whipped cream or a scoop of coconut ice cream. The texture is best enjoyed at room temperature, where its chegrape juicess is most pronounced. Enjoy every delightful, sticky bite!
Conclusion:
I hope you’re as excited to bake this Sticky Coconut Cake as I am to have shared it with you! This recipe is a true winner because it delivers an incredibly moist and fragrant cake with that irresistible caramel-like sticky topping. The combination of sweet coconut and that luscious glaze is simply divine, making it perfect for any occasion, from casual afternoon tea to a special celebration. Don’t be intimidated by the “sticky” aspect; the steps are straightforward, and the result is absolutely worth it.
For serving, I love a simple dusting of extra toasted coconut or a dollop of lightly sweetened whipped cream. It’s also fantastic on its own! If you’re feeling adventurous, consider adding a sprinkle of lime zest to the batter for a tropical twist, or perhaps a handful of chopped macadamia nuts for an extra crunch. I truly encourage you to give this sticky coconut cake a try. I’m confident you’ll fall in love with its unique texture and delightful flavor!
Frequently Asked Questions:
Can I make this cake ahead of time?
Yes, absolutely! This sticky coconut cake often tastes even better the next day as the flavors meld together. Store it in an airtight container at room temperature for up to 3 days. The sticky topping might become slightly firmer upon refrigeration, so you can gently warm a slice in the oven or microwave if desired.
What kind of coconut should I use?
For the best flavor and texture, I recommend using unsweetened shredded coconut or desiccated coconut for both the cake batter and the topping. This allows you to control the sweetness and ensures a good coconutty presence throughout. Flaked coconut can also work, but might yield a slightly different texture.
My sticky topping looks a bit too thin, what can I do?
If your sticky topping seems a bit thin after baking, don’t worry! Sometimes the moisture content of the coconut can affect it. You can try returning the cake to the oven for another 5-10 minutes at a slightly lower temperature (around 325°F or 160°C) to allow some of the liquid to evaporate and thicken. Keep a close eye on it to prevent burning.
Sticky Coconut Cake
A delightfully sweet and chewy cake made with coconut milk and glutinous rice flour, creating a rich, tropical flavor and a satisfyingly sticky texture.
Ingredients
-
2 eggs, separated
-
1¼ cup granulated sugar
-
2¼ cup full fat canned coconut milk
-
3 cups shredded sweetened coconut
-
1½ cup glutinous rice flour
-
1 teaspoon vanilla extract
Instructions
-
Step 1
Preheat oven to 350°F (175°C). Grease and flour a 9×13 inch baking pan. -
Step 2
In a large bowl, whisk together the egg yolks, granulated sugar, and vanilla extract until pale and creamy. -
Step 3
Gradually whisk in the coconut milk until well combined. -
Step 4
Add the glutinous rice flour and shredded coconut to the wet ingredients. Stir until a thick batter forms. -
Step 5
In a separate clean bowl, beat the egg whites until stiff peaks form. Gently fold the beaten egg whites into the batter until just combined. -
Step 6
Pour the batter into the prepared baking pan and spread evenly. -
Step 7
Bake for 45-55 minutes, or until a toothpick inserted into the center comes out clean and the top is golden brown. -
Step 8
Let the cake cool in the pan for at least 30 minutes before slicing and serving. It is best served warm.
Important Information
Nutrition Facts (Per Serving)
It is important to consider this information as approximate and not to use it as definitive health advice.
Allergy Information
Please check ingredients for potential allergens and consult a health professional if in doubt.